How to Use kubectl port-forward Effectively


In the intricate world of container orchestration, Kubernetes has cemented its position as the de facto standard for deploying, managing, and scaling applications. While its robust capabilities bring unparalleled advantages in terms of reliability and scalability, they also introduce a layer of abstraction that can sometimes complicate the most fundamental developer task: accessing an application or service for local testing and debugging. Imagine a scenario where your application is running within a Kubernetes cluster, perhaps a microservice tucked away in a private network, and you need to interact with it directly from your local machine, whether to inspect its behavior, test a new feature, or debug a stubborn issue. This is precisely where kubectl port-forward emerges as an indispensable tool in the Kubernetes developer's toolkit.
kubectl port-forward provides a temporary, secure tunnel from your local machine directly to a pod, deployment, or service within your Kubernetes cluster. It’s the digital equivalent of a secret passage, allowing you to bypass the complex networking layers and firewall rules that typically separate your local environment from the cluster's internal network. This seemingly simple command is a powerhouse for development and debugging, enabling developers to simulate local interaction with remote services without the need for cumbersome public exposures or complex network configurations.
This comprehensive guide will embark on a detailed exploration of kubectl port-forward. We will peel back the layers to understand its underlying mechanics, walk through practical examples for basic and advanced usage, discuss its security implications, and outline best practices to integrate it seamlessly into your daily development workflow. Crucially, we will also delineate its role within the broader Kubernetes ecosystem, distinguishing it from production-grade solutions like API Gateways, and highlighting when to leverage each tool effectively. By the end of this article, you will not only be proficient in using kubectl port-forward but will also possess a deeper understanding of its strategic importance in efficient Kubernetes application development.
Understanding the Core Problem: Accessing Services in Kubernetes
Before diving into the mechanics of kubectl port-forward, it's vital to grasp the architectural nuances of Kubernetes networking that necessitate such a tool. Kubernetes is designed to isolate application workloads, providing each pod with its own IP address, often within a private, cluster-internal network. This isolation is fantastic for security, resource management, and preventing conflicts, but it inherently makes direct access from outside the cluster challenging.
When you deploy an application in Kubernetes, it typically runs inside one or more pods. These pods are ephemeral; they can be created, destroyed, and rescheduled across different nodes at any time. Each pod gets its own IP address, but these IPs are not typically routable from outside the cluster. To make your application accessible, even internally within the cluster, Kubernetes introduces the concept of Services. A Service acts as a stable, abstract entry point to a logical set of pods. It provides a consistent IP address and DNS name that other pods within the cluster can use to communicate with your application, regardless of which specific pod instances are running or on which nodes they reside.
However, even a Kubernetes Service's ClusterIP, while stable, is still internal to the cluster. External access requires additional mechanisms:
- NodePort: Exposes a Service on a static port on each node's IP address. This means if you have three nodes, the service is accessible on
node1_ip:NodePort,node2_ip:NodePort, andnode3_ip:NodePort. While it provides external access, it's generally not suitable for production due to port collisions, limited port range, and exposing nodes directly. - LoadBalancer: Available when running on cloud providers (AWS, GCP, Azure, etc.), this type of Service provisions an external load balancer, which then routes external traffic to your Service within the cluster. This is ideal for exposing services to the internet in a production environment, but it incurs costs and might involve DNS setup.
- Ingress: An API object that manages external access to services in a cluster, typically HTTP/S. Ingress provides URL-based routing, SSL termination, and host-based virtual hosting, acting as a smart router for external traffic. It requires an Ingress Controller to be deployed in the cluster.
While NodePort, LoadBalancer, and Ingress are perfect for exposing applications to a wider audience or for production traffic, they often involve public IPs, DNS configurations, and sometimes cloud resource provisioning. For a developer who simply needs to access a specific microservice's api endpoint for a few minutes to debug an issue, or to test a local frontend application against a remote backend, these methods are overkill and potentially insecure if not configured meticulously. Setting up an Ingress for every temporary debugging session, or constantly provisioning and de-provisioning LoadBalancers, is impractical and inefficient. This is where the targeted, on-demand nature of kubectl port-forward shines. It provides a simple, direct, and temporary tunnel, specifically designed for local development and debugging, without permanently altering the cluster's network configuration or exposing services broadly. It creates a bridge, a specific kind of gateway, from your local machine into the heart of your Kubernetes network.
The Mechanics of kubectl port-forward: How it Works Under the Hood
At its core, kubectl port-forward establishes a secure, client-side tunnel that pipes network traffic from a local port on your machine to a specific port on a pod or service within your Kubernetes cluster. It's a remarkably elegant solution that leverages the existing Kubernetes API server as an intermediary, negating the need for direct network routes or complex firewall rule modifications.
The Command Syntax and Its Components
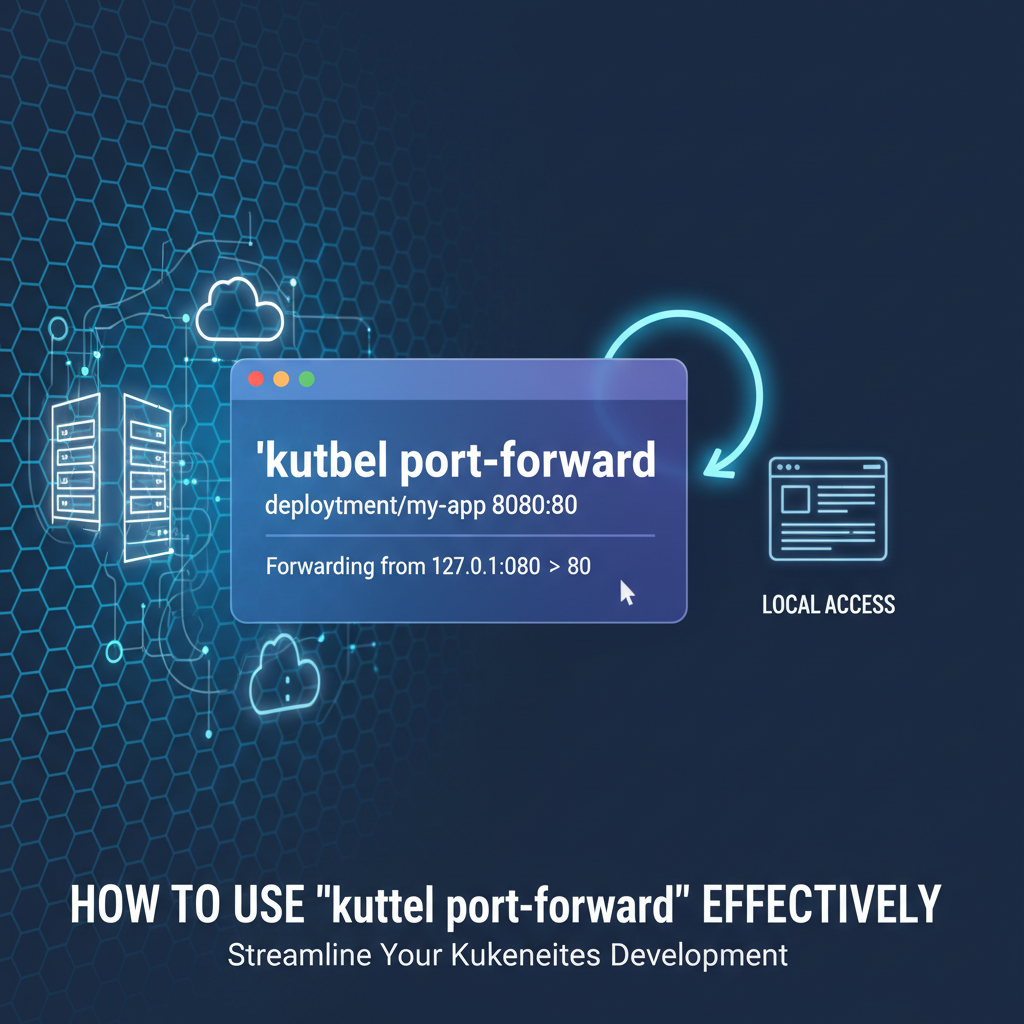
The basic syntax for kubectl port-forward is straightforward:
kubectl port-forward [RESOURCE_TYPE]/[RESOURCE_NAME] [LOCAL_PORT]:[REMOTE_PORT]
Let's break down each component:
kubectl: This is the command-line tool for interacting with your Kubernetes cluster. It's your primary interface for sending commands to the Kubernetes API server.port-forward: This is the specific subcommand that initiates the tunneling process.[RESOURCE_TYPE]/[RESOURCE_NAME]: This specifies the target within your Kubernetes cluster to which you want to forward traffic. You have several options here:pod/[POD_NAME]: This is the most granular target. When you forward to a pod, the connection is established directly to a specific container within that pod. This is useful when you need to debug an individual instance of an application or access a sidecar container. For example:kubectl port-forward pod/my-app-pod-xyz-abc 8080:80.deployment/[DEPLOYMENT_NAME]: You can forward to a deployment. In this case,kubectlintelligently selects one of the healthy pods managed by that deployment and forwards traffic to it. If the selected pod is terminated, theport-forwardconnection will break. Example:kubectl port-forward deployment/my-app-deployment 8080:80.service/[SERVICE_NAME]: This is often the most robust and recommended target. When you forward to a service,kubectlestablishes the tunnel to the service's ClusterIP. The Kubernetes Service then handles load balancing and routing the traffic to one of its healthy backend pods. If a pod behind the service dies, the Service will automatically route traffic to another available pod, maintaining theport-forwardconnection (unless all pods die). Example:kubectl port-forward service/my-app-service 8080:80.- You can also use shorthands like
poforpodandsvcforservice. For example,kubectl port-forward svc/my-app-service 8080:80.
[LOCAL_PORT]: This is the port number on your local machine that you want to use to access the remote service. When you send traffic tolocalhost:[LOCAL_PORT],kubectlintercepts it and sends it through the tunnel. If omitted,kubectlwill automatically pick a free local port.[REMOTE_PORT]: This is the port number exposed by the container within the target pod or the port defined by the Kubernetes Service. This is the port your application is listening on inside the cluster.
The Underlying Process: A Journey Through the Tunnel
Understanding how port-forward works internally provides valuable insight into its security implications and limitations:
- Initiation: When you execute the
kubectl port-forwardcommand, yourkubectlclient sends a request to the Kubernetes API server. This request essentially says, "I want to establish a port-forwarding session to this specific resource (pod/service) on this remote port, and I'll be listening on this local port." - API Server as Proxy: The Kubernetes API server acts as the central hub. It authenticates and authorizes your request (based on your
kubeconfigand RBAC permissions). If you have the necessary permissions (specifically, theportforwardverb for the target resource), the API server then establishes a connection to the Kubelet agent running on the node where the target pod resides. - Kubelet's Role: The Kubelet is an agent that runs on each node in the cluster. It's responsible for managing pods on that node. When it receives the request from the API server, it establishes a stream (typically SPDY or HTTP/2) directly to the specific container within the target pod.
- Data Flow: Once this multi-hop connection is established (Local Machine ->
kubectl-> Kubernetes API Server -> Kubelet -> Target Container),kubectlbegins to listen on the[LOCAL_PORT]on your machine. Any traffic directed tolocalhost:[LOCAL_PORT]is then encapsulated and sent through this secure tunnel. The API server transparently forwards this traffic to the Kubelet, which in turn injects it into the target container's network namespace on[REMOTE_PORT]. Responses from the container follow the reverse path back to your local machine.
Crucially, kubectl port-forward operates entirely at the application layer (Layer 7) in terms of its user interaction, but it tunnels raw TCP traffic. It doesn't modify any network configurations on the cluster nodes, nor does it create any persistent network routes. It's a temporary, on-demand, user-initiated tunnel that exists only as long as the kubectl port-forward process is running on your local machine. This characteristic is precisely what makes it so useful for development and debugging – it's non-invasive and easy to tear down.
Security Implications and RBAC
The ability to establish a direct tunnel into a running pod is powerful and, consequently, requires careful consideration of security. To successfully execute kubectl port-forward, the user (or the service account associated with the kubectl client) must have the necessary Role-Based Access Control (RBAC) permissions. Specifically, the user needs:
getandlistpermissions on pods.createpermission on thepods/portforwardsubresource (for pods and deployments) orservices/portforwardsubresource (for services).
Without these permissions, the API server will reject the request. This is a critical security feature, ensuring that only authorized users can establish these tunnels into your cluster. While kubectl port-forward itself encrypts traffic between your kubectl client and the API server (using HTTPS), the traffic between the API server and the Kubelet, and then to the pod, might be plaintext depending on your cluster's configuration, though modern Kubernetes installations increasingly secure these internal communications. Developers should always be mindful of the data they are exposing through these temporary tunnels, especially when dealing with sensitive information.
Basic Usage Scenarios and Examples
Mastering kubectl port-forward begins with understanding its common applications. Let's walk through typical scenarios with practical command examples and explanations.
1. Forwarding to a Specific Pod
This is the most direct use case. You have identified a particular pod instance you want to interact with, perhaps because it's exhibiting a specific issue, or you need to access a unique service running within it.
Scenario: You have a pod named my-web-app-8675309-abcd running a web server on port 80. You want to access it from your local machine on port 8080.
Steps:
- Find the pod name:
bash kubectl get pods(Let's assume the output showsmy-web-app-8675309-abcd) - Execute the
port-forwardcommand:bash kubectl port-forward pod/my-web-app-8675309-abcd 8080:80or simply:bash kubectl port-forward my-web-app-8675309-abcd 8080:80
Explanation: This command will block your terminal. While it's running, you can open your web browser or use curl to access http://localhost:8080. All traffic to this local address and port will be routed directly to port 80 of the my-web-app-8675309-abcd pod. This is invaluable for isolated debugging, inspecting logs in real-time while interacting, or testing an api directly.
Use Cases: * Debugging a specific pod instance: When you suspect a particular pod is misbehaving and want to interact with only that instance. * Accessing a database within a pod: If you have a database (e.g., PostgreSQL, Redis) running as a container in a pod, you can forward its port to connect with local GUI tools or clients. * Interacting with a sidecar container: If your pod has multiple containers (e.g., your application and an observability agent sidecar), you can forward to a specific container's port within that pod.
2. Forwarding to a Deployment
Sometimes, you don't care about a specific pod instance but rather any healthy pod managed by a particular deployment. kubectl port-forward can handle this abstraction.
Scenario: You have a deployment named my-api-deployment that manages several pods, each exposing an api on port 5000. You want to test the api from your local machine on port 9000.
Steps:
kubectl port-forward deployment/my-api-deployment 9000:5000
or simply:
kubectl port-forward deploy/my-api-deployment 9000:5000
Explanation: When targeting a deployment, kubectl will automatically select one of the currently running and healthy pods associated with that deployment and establish the forward to it. This provides a convenient way to access "your application" rather than a specific pod.
Important Consideration: If the selected pod is terminated or crashes while port-forward is active, the port-forward session will terminate because its target has disappeared. You would then need to restart the command. For more robust connections, forwarding to a Service is generally preferred.
3. Forwarding to a Service
Forwarding to a Service is often the most resilient approach, especially if the underlying pods are dynamic or you need a stable connection that can tolerate pod restarts.
Scenario: You have a Kubernetes Service named payment-gateway-service that exposes a payment gateway api on port 80. You want to access this api from your local machine on port 8080.
Steps:
kubectl port-forward service/payment-gateway-service 8080:80
or simply:
kubectl port-forward svc/payment-gateway-service 8080:80
Explanation: When you target a Service, kubectl first resolves the Service's ClusterIP. The port-forward tunnel is established to this ClusterIP. Any traffic sent through your local 8080 port will then hit the Service's ClusterIP on port 80. The Service, in turn, load-balances this traffic to one of its healthy backend pods. If one of the pods serving the payment-gateway-service goes down, the Service will automatically route subsequent requests to another healthy pod, and your port-forward connection will remain active and functional (as long as at least one healthy pod exists).
Use Cases: * Testing a local frontend against a remote backend: Your frontend application (running locally) can make api calls to http://localhost:8080, and these calls will transparently reach your backend service in Kubernetes. * Interacting with a microservice: When you need a stable access point to a microservice for extended testing or integration. * Developing locally with remote dependencies: Connecting your local development environment to a remote database, message queue, or cache service running in Kubernetes.
4. Forwarding Multiple Ports Simultaneously
You might need to access multiple services or multiple ports on the same service/pod. kubectl port-forward supports this.
Scenario: You need to access a service that exposes an HTTP api on port 80 and a metrics endpoint on port 9090.
Steps:
kubectl port-forward service/my-app-service 8080:80 9091:9090
Explanation: This command establishes two independent tunnels: one from local 8080 to remote 80, and another from local 9091 to remote 9090. You can then access both endpoints through localhost:8080 and localhost:9091.
5. Specifying Address for Listening (--address)
By default, kubectl port-forward listens only on localhost (127.0.0.1). If you need to expose the forwarded port to other devices on your local network (e.g., another machine, a VM), you can specify the address.
Scenario: You want to access a service from another machine on your local network.
Steps:
kubectl port-forward service/my-app-service 8080:80 --address 0.0.0.0
Explanation: Using --address 0.0.0.0 makes the local forwarded port accessible on all network interfaces of your machine. This means other devices on the same network can reach it using your machine's IP address (e.g., http://your_machine_ip:8080). Be cautious with this, as it increases the exposure of the forwarded service.
6. Backgrounding the Process
kubectl port-forward typically runs in the foreground, blocking your terminal. For continuous access during development, you'll often want to run it in the background.
Methods:
- Using
&(Linux/macOS):bash kubectl port-forward service/my-app-service 8080:80 &This runs the command in the background, but its output might still appear in your terminal. You can usejobsto manage background processes. - Using
nohup(Linux/macOS):bash nohup kubectl port-forward service/my-app-service 8080:80 > /dev/null 2>&1 &This detaches the process from your terminal and redirects all output to/dev/null, making it truly run silently in the background. - For Windows users: You might need to open a new terminal window or use a specific backgrounding utility, as
&andnohupare Unix-specific. Alternatively, run it in a separatecmdor PowerShell window.
Troubleshooting Common Issues
Even with its simplicity, port-forward can encounter issues:
error: unable to listen on any of the listeners: [::]:8080: listen tcp [::]:8080: bind: address already in use:- Problem: The
[LOCAL_PORT]you specified (e.g.,8080) is already in use by another application on your local machine. - Solution: Choose a different
[LOCAL_PORT]that is free. You can check occupied ports withnetstat -ano | findstr :8080(Windows) orlsof -i :8080(Linux/macOS).
- Problem: The
error: Pod "my-app-pod-xyz-abc" not found.:- Problem: The pod name, deployment name, or service name is incorrect, or it's in a different namespace.
- Solution: Double-check the name and ensure you're in the correct namespace (
kubectl config set-context --current --namespace=your-namespaceor use-n your-namespacewith the command).
error: dial tcp 10.x.y.z:port: connect: connection refused:- Problem: The target pod/service is not listening on the specified
[REMOTE_PORT], or the pod is unhealthy/crashed. - Solution: Verify the
[REMOTE_PORT]matches the application's listening port inside the container. Check pod status (kubectl get pods), logs (kubectl logs pod-name), and events (kubectl describe pod pod-name).
- Problem: The target pod/service is not listening on the specified
error: You must be logged in to the server (Unauthorized):- Problem: Your
kubeconfigis not configured correctly, or your authentication token has expired. - Solution: Refresh your
kubeconfigor re-authenticate with your cluster.
- Problem: Your
By understanding these basic usage patterns and common troubleshooting steps, you can effectively leverage kubectl port-forward for the majority of your local development and debugging needs within a Kubernetes environment.
APIPark is a high-performance AI gateway that allows you to securely access the most comprehensive LLM APIs globally on the APIPark platform, including OpenAI, Anthropic, Mistral, Llama2, Google Gemini, and more.Try APIPark now! 👇👇👇
Advanced Techniques and Best Practices
While the basic usage of kubectl port-forward covers most common scenarios, a deeper understanding of its nuances and best practices can significantly enhance your development workflow and mitigate potential pitfalls.
1. Port-forwarding a StatefulSet
StatefulSets are used for stateful applications in Kubernetes, such as databases. Each pod in a StatefulSet has a stable network identity and persistent storage. When you need to access a specific instance of a database or another stateful component, port-forward is your go-to tool.
Scenario: You have a MongoDB StatefulSet named mongo-db, and you want to connect to the first instance (mongo-db-0) on its default port 27017 from your local machine on port 27017.
Steps:
kubectl port-forward mongo-db-0 27017:27017
Explanation: Since StatefulSet pods have predictable, stable names (e.g., mongo-db-0, mongo-db-1), you can directly target a specific pod instance by its name. This is crucial when you need to interact with a particular shard or replica of a stateful application. You wouldn't typically forward to the StatefulSet itself, but rather to an individual pod within it.
2. Security Considerations Revisited
While kubectl port-forward is primarily a development tool, its ability to bypass network segmentation warrants a second look at security:
- RBAC Permissions are Paramount: As mentioned, robust RBAC rules are essential. Users should only have
portforwardpermissions on resources they genuinely need to access. Granting broadportforwardpermissions can create a backdoor to internal services. - Sensitive Data Exposure: Be extremely cautious when forwarding ports for services handling sensitive data (e.g., production databases, internal
apis with PII). While the tunnel is secure between yourkubectlclient and the API server, the local exposure on your machine means anyone with access to your machine (or network if--address 0.0.0.0is used) could potentially access the service. - Temporary Nature:
port-forwardconnections should be temporary. Always terminate the command once debugging or testing is complete. Running unnecessaryport-forwardsessions keeps a potential access point open. - Limit Privileges: Avoid running
kubectl port-forwardwithrootprivileges unless absolutely necessary. - VPN/Secure Networks: When working with sensitive clusters, always ensure your local machine is connected via a VPN or a secure network.
port-forwarddoes not replace the need for secure network access to the cluster itself.
3. Integrating with Development Workflows
kubectl port-forward can become an integral part of an efficient developer workflow:
- Local UI/Frontend Development against Remote Backend: This is arguably one of the most common and powerful use cases. Developers can run their frontend application locally, enjoying fast feedback cycles and leveraging local development tools, while having it seamlessly communicate with the actual backend services running in Kubernetes through
port-forward. This avoids deploying the frontend to the cluster for every small change. - Local Microservice Development: If you're developing one microservice within a larger ecosystem, you can run your microservice locally and use
port-forwardto connect it to its dependencies (e.g., a shared message queue, a database, or other microservices) running in the Kubernetes cluster. This creates a "hybrid" development environment where some components are local and others are remote. - External Tool Integration: Use
port-forwardto connect local debuggers, database clients (e.g., DBeaver, pgAdmin), message queue inspectors, or other third-party tools directly to their counterparts running in the cluster. For example, connecting a local debugger to a remote JVM application. - Automating with Scripts: For recurring tasks, you can embed
kubectl port-forwardcommands into shell scripts (e.g.,start_dev.sh) that automatically set up all necessary tunnels for your local development environment. Remember to includekillcommands or trap signals to clean up background processes.
4. Limitations of kubectl port-forward
While incredibly useful, kubectl port-forward has inherent limitations that define its scope as a development and debugging tool, rather than a production-grade solution:
- Single Point of Failure (for Pod/Deployment targets): As discussed, if you target a specific pod or deployment, and that pod dies, your
port-forwardsession terminates. While forwarding to a Service mitigates this, it's still a single connection from your machine. - Not for Production Traffic: It cannot handle high-volume, concurrent production traffic. It's designed for individual developer use, not for serving requests from multiple external clients.
- No Advanced Features:
port-forwardoffers no features for authentication, authorization, rate limiting, traffic management (like routing or load balancing across multipleport-forwardtunnels), monitoring, or logging of forwarded traffic. It's a raw TCP tunnel. - Manual and Ephemeral: Each
port-forwardsession must be manually initiated and managed. It's ephemeral and disappears when the command is terminated. There's no persistent, declarative way to "configure"port-forwardaccess across an organization. - Network Latency: Depending on your geographical distance to the cluster,
port-forwardtraffic might incur noticeable latency, as it travels over the internet to the API server and then internally within the cluster.
5. When to Use port-forward vs. Other Tools
Understanding the ecosystem of Kubernetes access tools helps in making informed decisions:
kubectl exec: For executing commands directly inside a container (e.g., getting a shell, running a one-off script).port-forwardis for network access,execis for command execution.kubectl logs: For streaming logs from a container.port-forwardis for interaction,logsis for observation.- Ingress/LoadBalancer: For exposing services to external users/systems in a production environment, offering advanced routing, SSL termination, and scalability. Use
port-forwardfor temporary local access, not for public exposure. - VPN/Service Mesh: For securing and managing internal cluster-to-cluster or application-to-application communication, providing features like mutual TLS, traffic shaping, and observability.
port-forwardis a developer convenience, not an enterprise network solution.
By understanding these advanced techniques and being mindful of port-forward's inherent limitations, developers can wield this powerful tool with greater precision and confidence, making their Kubernetes development experience smoother and more efficient.
kubectl port-forward vs. Robust API Gateways: Understanding the Divide
Having extensively explored kubectl port-forward, it's crucial to understand its place within the broader landscape of network access and api management in Kubernetes. While port-forward is an invaluable developer utility, it is decidedly not a solution for managing production traffic or exposing services to external consumers. For those enterprise-grade requirements, a different class of infrastructure is essential: the api gateway. The distinction between these two concepts is fundamental to architecting secure, scalable, and manageable applications in a microservices environment.
The Role of an API Gateway
An api gateway acts as the single entry point for all api requests from clients to an enterprise's backend services. Instead of clients having to directly call individual microservices, they interact with the api gateway. This gateway then routes requests to the appropriate backend service, translating protocols if necessary, and often performing a host of other functions. It is, in essence, a sophisticated traffic manager and security enforcer for your apis, sitting at the edge of your microservices architecture.
The features an api gateway provides are extensive and critical for production environments, addressing the very shortcomings inherent in a simple tunneling mechanism like kubectl port-forward:
- Authentication and Authorization: An
api gatewaycentralizes security. It can authenticate incoming requests using various schemes (JWT, OAuth2, API Keys) and then authorize them against configured policies before forwarding them to backend services. This offloads security concerns from individual microservices. - Rate Limiting and Throttling: To protect backend services from overload and ensure fair usage,
api gateways can enforce rate limits, preventing denial-of-service attacks and ensuring system stability. - Traffic Management: This includes intelligent routing (e.g., routing based on URL path, headers, query parameters), load balancing across multiple service instances, circuit breaking to prevent cascading failures, and A/B testing or canary deployments.
- API Composition and Transformation: An
api gatewaycan aggregate multiple backend service calls into a singleapiresponse (API composition) or transform request/response formats (e.g., SOAP to REST). - Monitoring and Analytics: It provides a central point for logging all
apicalls, collecting metrics, and offering insights intoapiusage, performance, and errors. This data is invaluable for operational intelligence and business analytics. - Security Policies: Beyond basic authentication,
api gateways can enforce advanced security policies like WAF (Web Application Firewall) rules, IP whitelisting/blacklisting, and DDoS protection. - Developer Portal: Many
api gatewaysolutions come with a developer portal, allowing external and internal developers to discover, subscribe to, and testapis, complete with documentation and SDKs.
Comparing kubectl port-forward and an API Gateway
To highlight their distinct roles, let's look at a comparison table:
| Feature | kubectl port-forward |
Full-fledged API Gateway (e.g., APIPark) |
|---|---|---|
| Primary Use Case | Local development, debugging, temporary access | Production traffic management, api exposure, security, scalability |
| Traffic Source | Single local client (localhost) |
Numerous external clients (web, mobile, partners) |
| Target Audience | Developers | External consumers, internal teams, applications |
| Deployment Model | Client-side command, ephemeral tunnel | Server-side infrastructure component (cluster-deployed), persistent |
| Security (Auth/Authz) | Relies on kubectl RBAC for tunnel creation only |
Comprehensive authentication, authorization, token validation, access policies |
| Traffic Management | None (direct tunnel) | Load balancing, routing rules, rate limiting, circuit breaking, caching |
| Monitoring/Analytics | None (observability from kubectl logs for target pod) |
Detailed api call logging, performance metrics, dashboards, alerts |
| Scalability | Not scalable (single tunnel) | Highly scalable (supports cluster deployment, handles thousands of TPS) |
| API Lifecycle | Not applicable | Design, publication, versioning, deprecation, governance |
| Cost | Free (part of kubectl) |
Varies (open-source overhead, commercial licenses, cloud resources) |
| AI Model Integration | No direct features | Dedicated features for unifying and managing diverse AI models, prompt encapsulation |
| Multi-Tenancy | No direct features | Supports independent apis and permissions for each tenant/team |
Introducing APIPark: An Open Source AI Gateway & API Management Platform
While kubectl port-forward is indispensable for local development and debugging, it's crucial to understand that it serves a fundamentally different purpose than a production-ready api gateway. A gateway like port-forward merely creates a simple connection; a true api gateway is a sophisticated, strategic component of your infrastructure. For organizations seeking a comprehensive solution to manage their api landscape, particularly in the realm of AI and microservices, platforms like ApiPark offer significant advantages.
APIPark is an open-source AI gateway and api management platform, designed to help developers and enterprises manage, integrate, and deploy AI and REST services with ease. It directly addresses the challenges that kubectl port-forward intentionally sidesteps, offering a robust layer of abstraction, security, and traffic management that is paramount for production environments.
Instead of merely tunneling traffic, APIPark provides a powerful gateway for all your enterprise apis, ensuring high performance, detailed call logging, and advanced governance. It unifies the exposure and management of both traditional REST apis and modern AI models. For instance, kubectl port-forward can give you temporary access to an internal AI service, but APIPark will integrate over 100 AI models, standardize their invocation format, and even encapsulate custom prompts into reusable REST apis. This transforms internal, raw AI model access into managed, enterprise-ready apis.
Furthermore, APIPark tackles api lifecycle management end-to-end, from design and publication to invocation and decommission. It regulates api management processes, manages traffic forwarding, load balancing, and versioning of published apis – features completely absent from kubectl port-forward. With APIPark, teams can centralize the display of all api services, facilitating sharing and discovery across departments, a stark contrast to the isolated, personal tunnels created by port-forward. It even supports independent apis and access permissions for multiple tenants, enhancing security and resource utilization within an organization. For critical api resources, APIPark allows for subscription approval, ensuring that callers must be approved by an administrator before they can invoke an api, a level of access control far beyond what a simple port-forward could ever provide.
In essence, while kubectl port-forward allows a single developer to peek into a specific api or service, APIPark builds the entire gateway infrastructure to expose, secure, and manage potentially hundreds of apis for thousands of users. It's the difference between a temporary secret passage and a meticulously designed, highly secure, and efficiently managed main entrance to your digital services. Choosing between them is not about which is "better," but which tool is appropriate for the task at hand: port-forward for local development and debugging, and a robust api gateway like APIPark for production api management and delivery.
Conclusion
The journey through the intricacies of kubectl port-forward reveals it to be far more than just a simple command; it is a fundamental pillar of developer productivity in the Kubernetes ecosystem. We've seen how this versatile tool establishes secure, temporary tunnels from your local machine directly into the heart of your Kubernetes cluster, bypassing the complex networking layers that often separate development environments from remote services. From debugging a recalcitrant pod to testing a local frontend against a remote backend api, kubectl port-forward empowers developers with unparalleled direct access, fostering rapid iteration and efficient problem-solving.
We delved into its underlying mechanics, understanding how kubectl leverages the Kubernetes API server and Kubelet to orchestrate this intricate dance of network traffic. We explored numerous practical examples, from forwarding to individual pods and deployments to the more robust approach of targeting services, and even advanced techniques like simultaneous port forwarding and background execution. Along the way, we emphasized the critical importance of security considerations, particularly regarding RBAC permissions and the cautious handling of sensitive data.
Crucially, this guide also highlighted the essential distinction between kubectl port-forward and production-grade solutions like api gateways. While port-forward is an indispensable tool for individual developers to gain temporary, direct access, it lacks the sophisticated features required for managing, securing, and scaling apis in a production environment. For enterprise-level api management, particularly in the burgeoning field of AI services, a dedicated api gateway platform such as ApiPark provides the robust, feature-rich infrastructure needed for unified api exposure, traffic management, security, and lifecycle governance.
Mastering kubectl port-forward is an essential skill for any developer navigating the Kubernetes landscape. It provides a unique lens into your cluster, enabling local interaction with remote services in a way that is both powerful and non-invasive. By understanding its capabilities, limitations, and how it complements other tools in the Kubernetes toolkit, you can significantly streamline your development workflow, accelerate debugging cycles, and ultimately contribute to more efficient and reliable application delivery. Embrace kubectl port-forward as your secret passage to Kubernetes services, and unlock a new level of productivity in your cloud-native journey.
Frequently Asked Questions (FAQ)
1. What is kubectl port-forward and why is it useful?
kubectl port-forward is a Kubernetes command-line utility that creates a secure, temporary tunnel from a local port on your machine to a specific port on a pod, deployment, or service within your Kubernetes cluster. It's incredibly useful for local development and debugging, allowing developers to directly access internal cluster services (like web apis, databases, or microservices) from their local environment without exposing them publicly or configuring complex network rules. This enables faster iteration, local testing of applications against remote dependencies, and direct inspection of service behavior.
2. What are the different types of resources I can port-forward to?
You can port-forward to three primary resource types in Kubernetes: * Pod: kubectl port-forward pod/your-pod-name [local-port]:[remote-port] - Connects directly to a specific pod instance. If the pod restarts or is deleted, the connection breaks. * Deployment: kubectl port-forward deployment/your-deployment-name [local-port]:[remote-port] - kubectl picks one healthy pod managed by the deployment. Similar to pod forwarding, the connection breaks if the selected pod is terminated. * Service: kubectl port-forward service/your-service-name [local-port]:[remote-port] - This is generally the most robust option. kubectl connects to the Service's ClusterIP, and the Service then load-balances traffic to any healthy backend pod. If a backend pod fails, the Service routes to another, maintaining the connection (as long as healthy pods exist).
3. Is kubectl port-forward secure enough for production traffic?
No, kubectl port-forward is explicitly not designed for production traffic or exposing services to external users. It's a developer-centric debugging and testing tool. While the tunnel between your local kubectl client and the Kubernetes API server is typically secure (HTTPS), it lacks critical production features such as authentication for client requests, authorization policies, rate limiting, load balancing, advanced traffic management, and comprehensive logging/monitoring. For production-grade api exposure and management, dedicated solutions like Kubernetes Ingress, LoadBalancers, or a full-fledged api gateway (e.g., APIPark) are required.
4. How does an API Gateway differ from kubectl port-forward?
An api gateway and kubectl port-forward serve fundamentally different purposes. kubectl port-forward creates a simple, temporary, client-side tunnel for a single developer's local access. It's a debugging convenience. An api gateway, on the other hand, is a sophisticated, server-side infrastructure component that acts as the single entry point for all client requests to an organization's microservices and apis. It provides production-essential features like centralized authentication and authorization, rate limiting, intelligent routing, load balancing, api composition, comprehensive monitoring, and api lifecycle management. Platforms like ApiPark exemplify a modern api gateway designed for scale, security, and manageability of apis in a production environment, including specialized features for AI models.
5. What are some common troubleshooting tips for kubectl port-forward?
- "Address already in use" error: This means the local port you're trying to use is already occupied by another process on your machine. Try a different local port.
- "Pod/Service not found" error: Double-check the spelling of your pod, deployment, or service name, and ensure you are in the correct Kubernetes namespace.
- "Connection refused" error: The remote port might be incorrect, or the application inside the target pod is not listening on that port, or the pod itself might be unhealthy. Check your application's configuration and the pod's status and logs (
kubectl get pods,kubectl logs <pod-name>). - Permissions errors: Ensure your Kubernetes user has the necessary RBAC permissions (
getandliston pods, andcreateonpods/portforwardorservices/portforward) to establish the tunnel.
🚀You can securely and efficiently call the OpenAI API on APIPark in just two steps:
Step 1: Deploy the APIPark AI gateway in 5 minutes.
APIPark is developed based on Golang, offering strong product performance and low development and maintenance costs. You can deploy APIPark with a single command line.
curl -sSO https://download.apipark.com/install/quick-start.sh; bash quick-start.sh

In my experience, you can see the successful deployment interface within 5 to 10 minutes. Then, you can log in to APIPark using your account.

Step 2: Call the OpenAI API.