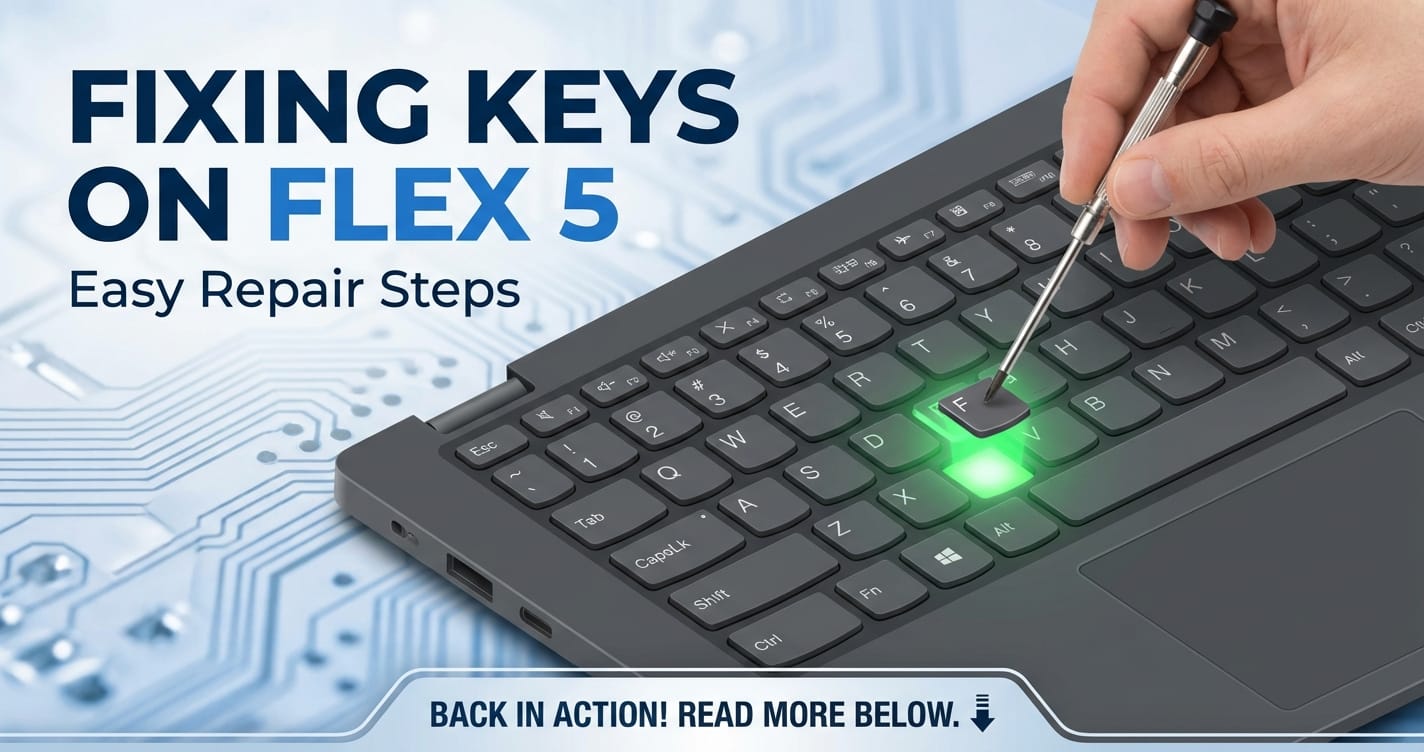
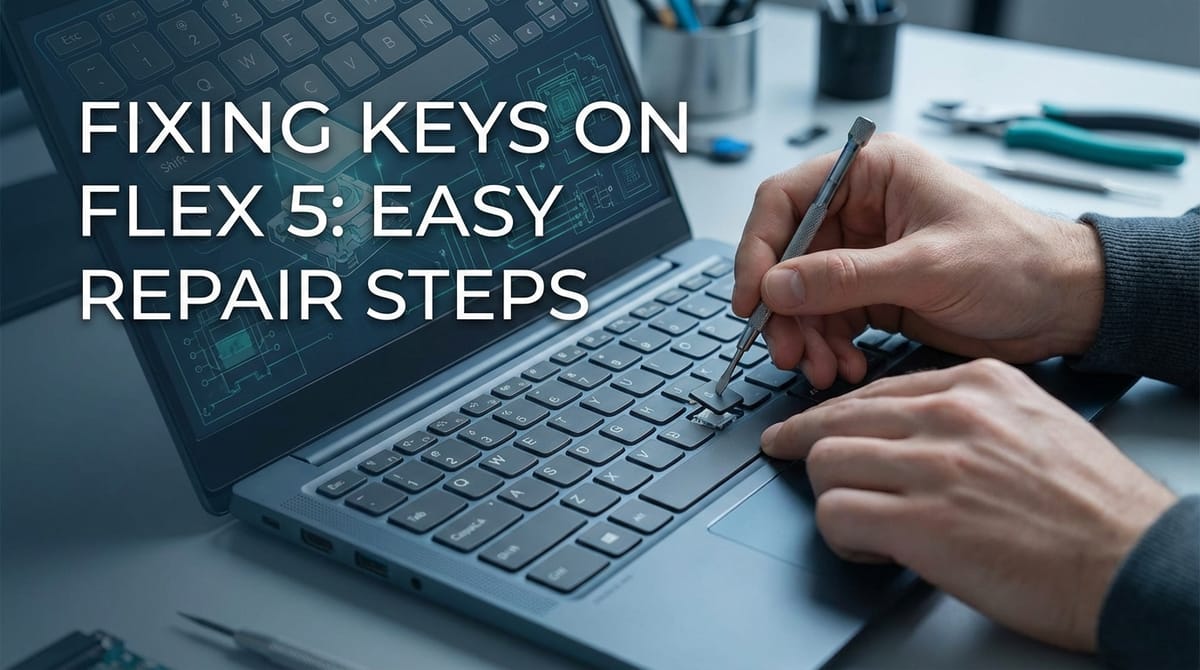
Fixing Keys on Flex 5: Easy Repair Steps


The Lenovo Flex 5 series of laptops offers a compelling blend of versatility, performance, and affordability, making it a popular choice for students, professionals, and casual users alike. Its 2-in-1 design, touch screen capabilities, and solid hardware specifications deliver a robust computing experience. However, even the most reliable devices can encounter issues over time, and a common frustration that can significantly impede productivity is a malfunctioning keyboard key. Whether it’s a sticky key, a completely unresponsive button, or a key that pops off repeatedly, these minor glitches can turn simple tasks into exasperating challenges. Imagine trying to compose an important email, write code, or even just search the web, only to find that critical letters or commands are consistently missed. This isn't just an inconvenience; it can be a serious bottleneck to your workflow, disrupting the smooth api of human-computer interaction that a keyboard is designed to provide.
This comprehensive guide is designed to empower Flex 5 owners to diagnose and fix common keyboard key issues with confidence. We’ll delve into the anatomy of your laptop's keys, explore the most frequent causes of failure, and provide a detailed, step-by-step approach to repair. From simple cleaning to more involved replacement procedures, we'll equip you with the knowledge and techniques necessary to restore your Flex 5's keyboard to its original, perfectly responsive state. Our goal is to transform your frustration into a satisfying DIY success story, ensuring your valuable device continues to serve as a reliable gateway to your digital world, free from the hindrance of a faulty key.
Understanding the Lenovo Flex 5 Keyboard: Anatomy and Common Ailments
Before diving into repairs, it's crucial to understand the fundamental components that make up your Flex 5's keyboard and the typical reasons why they might fail. A laptop keyboard isn't just a collection of plastic caps; it's a intricate system designed for precision and durability, yet susceptible to various stressors. Each key on your Flex 5 is composed of several layers that work in harmony to register your keystrokes.
At the very top, you have the keycap, the plastic piece you physically press. This is the most visible and often the first component to show signs of wear or damage. Beneath the keycap lies the retainer clip, also known as the scissor mechanism (or sometimes a butterfly mechanism in older or different laptop models, though Flex 5 typically uses a variation of the scissor type). This intricate plastic framework provides the key's stability, ensures even pressure distribution, and allows it to travel smoothly up and down. It's often the unsung hero, ensuring the tactile feedback and precise movement you expect from a quality keyboard. Below the retainer clip is a small, flexible rubber dome (or a similar spring-loaded switch mechanism) that acts as both a spring to return the keycap to its resting position and a conductive pad. When the key is pressed, this dome collapses, allowing the conductive pad to make contact with the underlying circuit board. Finally, the membrane or circuit board beneath registers the electrical signal from the depressed dome, sending it to the laptop's internal mcp (Main Control Panel, often referring to the motherboard's integrated circuits responsible for processing input), which translates it into the character or command you intended. This intricate dance happens thousands of times a day, demanding precision from each component.
Common causes of key failure are surprisingly diverse, ranging from the mundane to the accidental:
- Dirt and Debris Accumulation: This is by far the most frequent culprit. Tiny crumbs, dust, pet hair, and other particles can wedge themselves under the keycap or within the scissor mechanism, preventing the key from moving freely or the rubber dome from making proper contact. Over time, this buildup can solidify, creating a sticky residue that further hampers key functionality. The consequence can be anything from a key feeling "mushy" to completely unresponsive.
- Liquid Spills: A spilled drink – be it coffee, soda, or even water – is a laptop's arch-nemesis. Liquids can seep under the keycaps, shorting out circuits, dissolving adhesive, or causing keys to stick due to sugar residues. Even a small amount of liquid can cause widespread damage, affecting not just one key but an entire region of the keyboard. The corrosive nature of some liquids can lead to long-term damage if not addressed promptly.
- Physical Damage: Forceful keystrokes, accidental impacts, or attempting to pry off keycaps incorrectly can damage the delicate retainer clips or the keycap itself. A broken clip means the keycap won't sit properly, will wobble, or might pop off entirely, rendering the key unusable. Similarly, a cracked keycap, while aesthetically displeasing, can also affect the key's stability and travel.
- Wear and Tear: Over years of heavy use, the rubber domes can lose their elasticity, leading to keys that feel less responsive or don't spring back as effectively. The plastic components of the retainer clips can also degrade, becoming brittle and prone to breaking. This kind of wear is often a sign of a well-loved machine that has seen countless hours of dedicated service.
- Software Glitches: While less common for individual key failure, software issues can sometimes mimic hardware problems. Outdated keyboard drivers, conflicting applications, or operating system bugs can occasionally cause keys to behave erratically or not respond at all. Diagnosing these requires a different approach than physical repair, focusing on the system's underlying apis for input handling.
Early and accurate diagnosis is paramount. A key that feels "off" might just need a simple cleaning, while a completely dead key could indicate a more serious underlying issue. Identifying the root cause will save you time, effort, and potentially prevent further damage, ensuring your repair efforts are targeted and effective. Understanding these common failure points sets the stage for a systematic approach to troubleshooting and repair, transforming a daunting task into a manageable project.
Essential Tools and Preparations for a Successful Key Repair
Embarking on any DIY repair project requires the right tools and a structured approach to preparation. Attempting to fix a Flex 5 key without the necessary equipment or proper precautions can lead to frustration, further damage to your laptop, or even personal injury. Think of it like a surgeon preparing for an operation; meticulous planning and the correct instruments are non-negotiable for a successful outcome.
Here’s a detailed breakdown of the essential tools you’ll need and the critical preparatory steps:
Essential Tools:
- Plastic Pry Tools (Spudgers): These are indispensable for safely removing keycaps and gently separating plastic components without scratching or marring your laptop's finish. Metal screwdrivers are too harsh and can easily cause cosmetic or structural damage. A set of varied plastic pry tools, often found in phone or laptop repair kits, is highly recommended.
- Small Phillips-Head Screwdriver: While individual key repair usually doesn't require opening the laptop chassis, a small Phillips-head screwdriver (typically PH00 or PH000) might be needed if you suspect a deeper issue or if you're planning to remove the entire keyboard assembly (a more advanced step we'll discuss later).
- Compressed Air Duster: An absolute must-have for dislodging dust, crumbs, and other dry debris from under and around the keys. Opt for a can with a thin nozzle for precise application. Always use compressed air in short bursts and hold the can upright to prevent propellant discharge onto your components.
- Isopropyl Alcohol (IPA) - 90% or higher: For cleaning sticky residues from spills. IPA evaporates quickly and leaves no residue, making it ideal for electronics. Lower concentrations contain more water, which can be detrimental.
- Lint-Free Cloths or Microfiber Wipes: Essential for applying IPA and wiping away grime without leaving behind fibers that could cause new problems. Cotton swabs (Q-tips) can also be useful for precise cleaning in tight spaces.
- Tweezers: Fine-tipped tweezers can be invaluable for manipulating tiny components like retainer clips, picking up minuscule debris, or handling replacement parts.
- Magnifying Glass or Magnifying Lamp (Optional but Recommended): The components under a keycap are tiny. A magnifier can help you clearly see broken clips, misplaced springs, or stubborn debris, greatly simplifying the repair process.
- Small Container or Tray: For holding removed keycaps, screws, and other small parts. Losing a tiny screw or a delicate retainer clip can halt your repair entirely. Labeling compartments can be beneficial for larger disassembly tasks.
- Replacement Parts (If Needed): If you've identified a broken keycap or retainer clip, having a replacement on hand is crucial. These can often be sourced from specialized laptop parts retailers or through keyboard part vendors online. Ensure compatibility with your specific Flex 5 model.
Crucial Preparations:
- Power Off and Disconnect Power: This is the golden rule for any electronics repair. Completely shut down your Flex 5. Don't just close the lid; perform a full shutdown. Then, unplug the AC adapter. This eliminates the risk of electrical shorts and protects both you and your laptop.
- Disconnect the Battery (for deeper repairs): If you anticipate needing to open the laptop chassis or are dealing with liquid damage, disconnecting the internal battery is a non-negotiable safety step. This prevents any residual power from flowing through the components. For some Flex 5 models, this might involve removing the bottom cover and carefully disconnecting a cable. Always consult your laptop's service manual for specific battery disconnection instructions.
- Anti-Static Measures: Static electricity can severely damage sensitive electronic components. Before you begin, touch a grounded metal object (like a radiator or a metal faucet) to discharge any static buildup from your body. Even better, use an anti-static wrist strap connected to a grounded point on your laptop's metal chassis (once the power is off).
- Prepare Your Workspace: Choose a clean, well-lit, and uncluttered work surface. A smooth, non-slip surface is ideal. Lay down an anti-static mat if you have one. Ensure good lighting so you can clearly see the tiny components you'll be working with. Organization is key; keep your tools arranged and your small parts contained.
- Backup Your Data (Critical!): Although fixing a key is generally a low-risk procedure, unforeseen complications can always arise, especially if you venture into deeper disassembly. It is always prudent to back up all important data before performing any internal work on your computer. This mitigates the worst-case scenario of data loss.
- Reference Material: Have your Flex 5's specific model number handy. If you need to order replacement parts, this is critical. If you're going to attempt more advanced repairs like full keyboard replacement, find a service manual or a reputable disassembly guide for your exact model online. This ensures you know the precise locations of screws, clips, and fragile connectors.
By meticulously gathering your tools and adhering to these preparatory steps, you're not just ready to fix a key; you're setting yourself up for a safe, efficient, and ultimately successful repair experience. This structured approach mirrors the best practices in any complex system management, whether it's hardware maintenance or managing a sophisticated api gateway for software services – preparation is the bedrock of success.
Troubleshooting Key Issues: Differentiating Software from Hardware Problems
Before you reach for your pry tools, it's crucial to determine whether your key issue stems from a hardware malfunction or a software glitch. Misdiagnosing the problem can lead to unnecessary physical disassembly, potential damage, or a frustrating waste of time. A methodical troubleshooting approach will guide you towards the correct solution, much like developers use debugging tools to pinpoint errors in an api integration.
Software Checks First:
These steps are quick, non-invasive, and often resolve seemingly hardware-related keyboard issues.
- Restart Your Laptop: This is the quintessential first step for almost any computer problem. A simple reboot can clear temporary software glitches, refresh drivers, and resolve conflicts that might be affecting keyboard input. Don't underestimate the power of a fresh start.
- Check Keyboard Drivers:
- Right-click the Start button and select "Device Manager."
- Expand "Keyboards."
- Right-click on your keyboard device (it might be listed as "Standard PS/2 Keyboard" or similar) and select "Update driver." Choose to search automatically for updated driver software.
- If that doesn't work, try "Uninstall device." Restart your computer; Windows will usually reinstall the driver automatically upon boot.
- Outdated or corrupted drivers can cause keys to stop responding or behave erratically, acting as a faulty api between the physical keyboard and the operating system.
- Test in Safe Mode or BIOS/UEFI:
- Safe Mode: Booting your Flex 5 into Safe Mode loads only essential drivers and services. If your key works in Safe Mode but not in normal mode, it strongly suggests a software conflict (e.g., a third-party application, antivirus, or background process) is interfering with keyboard input.
- BIOS/UEFI: Accessing your laptop's BIOS/UEFI settings (usually by pressing F2, Del, or another key immediately after power-on) provides a pre-OS environment. If the problematic key works correctly within the BIOS/UEFI menu, the issue is almost certainly software-related within Windows, not a physical hardware defect. This is a very reliable way to isolate hardware from software.
- Check Keyboard Layout and Language Settings: Accidentally changing your keyboard layout (e.g., from US QWERTY to UK QWERTY or a Dvorak layout) can make certain keys produce unexpected characters.
- Go to "Settings" > "Time & Language" > "Language."
- Ensure your preferred language is set, and under "Preferred languages," click on your language, then "Options," and check that the correct keyboard layout is active. Remove any unfamiliar layouts.
- System Restore Point: If the issue started recently after a software installation or update, performing a System Restore to a point before the problem began can often revert your system to a working state, effectively rolling back any problematic software changes. This can be a lifesaver for complex software conflicts.
These software checks are analogous to debugging an api request. You're checking the parameters, the environment, the processing logic, and the expected response before assuming the gateway (the physical keyboard or its direct connection) itself is broken. A well-designed api gateway like APIPark, for example, manages hundreds of AI models and REST services, ensuring standardized formats and smooth integration. Just as APIPark ensures the correct data format across various AI models to prevent application disruption, proper software configuration ensures your keyboard input reaches the OS correctly.
Hardware Inspection:
If the software checks yield no solution, it's time to consider a physical hardware problem.
- Visual Check for Debris or Damage:
- Carefully inspect the problematic key and the surrounding area. Use a flashlight if necessary. Look for obvious crumbs, hair, liquids, or any foreign objects lodged under the keycap.
- Examine the keycap itself for cracks or signs of damage.
- Look at the retainer clip (scissor mechanism) if you can peer under the key. Are any parts bent, broken, or dislodged?
- Individual Key Testing:
- Open a simple text editor (like Notepad) and systematically press each key, especially the problematic one, to observe its behavior. Note if it's completely unresponsive, registers multiple characters, or produces the wrong character.
- For keys that feel sticky or inconsistent, try pressing them repeatedly to see if the action improves. This can sometimes dislodge minor debris.
By meticulously going through these troubleshooting steps, you can confidently narrow down the cause of your Flex 5's keyboard issue. Only once you've exhausted the software possibilities should you proceed with the physical repair steps detailed in the next sections. This systematic approach ensures you're tackling the root cause efficiently and effectively.
Step-by-Step Guide to Repairing Individual Keys on Your Flex 5
Once you've determined that a specific key on your Flex 5 has a hardware issue, it's time to roll up your sleeves and get to work. Most individual key problems can be resolved with careful cleaning or the replacement of a small component. This section will guide you through the process, from safely removing the keycap to ensuring proper reassembly. Remember to work patiently and methodically, using the tools and preparations outlined earlier.
Step 1: Safely Removing the Keycap
Removing the keycap is the crucial first step to access the underlying components. This process requires a delicate touch to avoid damaging the keycap or the fragile retainer clip beneath it.
- Preparation: Ensure your laptop is fully powered off and unplugged. Clean your hands to avoid transferring oils or dirt.
- Identify Keycap Type: Most laptop keycaps are attached by two small clips on the retainer mechanism. Larger keys like the Spacebar, Shift, Enter, and Backspace often have a metal stabilizer bar in addition to the retainer clip for even pressure distribution.
- Technique for Standard Keys:
- Take your plastic pry tool (spudger) or a thin, blunt plastic object (like a guitar pick).
- Gently insert the tip under one edge of the keycap, preferably the top or bottom edge, where it might be slightly easier to pry.
- Apply very slight upward pressure. You should feel a tiny "pop" as one side of the keycap detaches from its clips.
- Move to the opposite side and repeat the gentle prying.
- Once both sides are released, the keycap should lift straight up. Avoid twisting or applying excessive force, as this can snap the delicate plastic tabs on the keycap or the retainer clip.
- Technique for Larger Keys (Spacebar, Shift, Enter, Backspace):
- These keys are trickier due to the metal stabilizer bar. You'll typically need to release the keycap from the retainer clips first, similar to standard keys.
- Once the keycap is mostly free, carefully lift it straight up, paying attention to the stabilizer bar connections. The metal bar often hooks into small plastic loops on the keycap. You may need to gently unhook these as you lift.
- Observe how the stabilizer bar is attached before fully removing the keycap – this will be crucial for reassembly.
- Storage: Place the removed keycap in your small container or tray to prevent it from getting lost.
Step 2: Cleaning Beneath the Keycap
Once the keycap is off, you'll have access to the retainer clip, the rubber dome, and the contact points. This is where most common key issues are resolved.
- Inspect for Debris: Visually inspect the area. Look for crumbs, dust bunnies, pet hair, or any foreign objects. Use your magnifying glass if necessary.
- Compressed Air for Dry Debris:
- Hold the compressed air can upright to prevent propellant release.
- Use short, controlled bursts to blow away loose dust and crumbs from around the retainer clip and the rubber dome.
- Angle the nozzle to ensure debris is propelled away from the keyboard, not deeper into the mechanism.
- Isopropyl Alcohol for Sticky Residues (Spills):
- If there was a liquid spill and the key feels sticky, moisten a lint-free cloth or a cotton swab with 90%+ isopropyl alcohol.
- Carefully wipe down the top surface of the rubber dome, the inner workings of the retainer clip, and the surrounding keyboard membrane.
- Be gentle; do not oversaturate the area. IPA evaporates quickly, but excessive liquid can seep into other components.
- Allow the area to dry completely (a few minutes) before proceeding. You can use compressed air briefly to aid drying if needed, but ensure it's fully evaporated.
- Clean the Keycap Itself: While you have the keycap off, give its underside a quick wipe with IPA on a lint-free cloth to remove any grime or residue that might have accumulated.
Step 3: Inspecting and Re-seating the Retainer Clip
The retainer clip (scissor mechanism) is the most delicate part of the key assembly and often the source of physical problems.
- Examine the Retainer Clip:
- With the keycap removed, you'll see the scissor-like mechanism. Carefully inspect it.
- Are both halves of the "scissor" mechanism intact? Look for any broken plastic tabs, cracks, or pieces that are bent out of shape.
- Is the clip properly seated on its base? It should sit flat and secure. Often, one side might be dislodged.
- Is the rubber dome beneath it intact and centered?
- Re-seating a Dislodged Clip:
- If the clip is merely dislodged but not broken, carefully align it with the small anchor points on the keyboard base.
- Gently press down on the center of the clip until it clicks into place. It should feel secure and stable, allowing the rubber dome to move freely underneath. You might need tweezers to manipulate it.
- Ensure the orientation is correct; clips are typically designed to fit in only one way. Pay attention to the direction of the "scissor" arms.
- Testing the Mechanism: Before reattaching the keycap, gently press down on the center of the retainer clip. It should depress smoothly and spring back up, activating the rubber dome with a satisfying tactile click. If it feels rough or sticks, re-examine for debris or misalignment.
Step 4: Replacing a Damaged Keycap or Retainer Clip (If Needed)
If your inspection reveals a broken keycap or a damaged retainer clip, cleaning alone won't fix the issue. You'll need replacement parts.
- Sourcing Replacement Parts:
- Identify your exact Lenovo Flex 5 model number.
- Search online for "Lenovo Flex 5 [your model number] keycap replacement" or "scissor mechanism replacement."
- Websites specializing in laptop parts or keyboard components often sell individual keycap and clip sets. You might also find them on marketplaces like eBay.
- Ensure the replacement part matches the exact design of your existing key – there can be subtle variations between manufacturing batches or regional models. Often, pictures are your best guide.
- Installing the New Retainer Clip:
- If you're replacing the clip, gently remove the broken one using tweezers, making sure not to damage the rubber dome or the underlying circuit.
- Carefully align the new retainer clip with the anchor points on the keyboard base.
- Press down gently but firmly on the center of the clip until it clicks securely into place. It should feel stable and move smoothly, returning to its upright position.
- Installing the New Keycap:
- For Standard Keys: Align the keycap precisely over the retainer clip. Press down firmly and evenly on the center of the keycap until you hear or feel two distinct clicks. This indicates it has snapped onto the retainer clip.
- For Larger Keys with Stabilizers: This requires more precision. First, hook the metal stabilizer bar into the small plastic loops on the underside of the keycap. Then, align the keycap over the retainer clip(s) and the stabilizer bar's anchor points on the keyboard base. Once properly aligned, press down firmly on the keycap until it clicks into place. You might need to gently adjust the keycap's position to ensure the stabilizer bar also seats correctly.
- Gently wiggle the keycap to ensure it's securely attached and doesn't wobble excessively.
After completing the repair, power on your Flex 5 and thoroughly test the repaired key, along with a few surrounding keys, in a text editor. Ensure it registers every press accurately, feels consistent with other keys, and springs back properly. This detailed, methodical approach ensures that even complex individual key issues can be resolved effectively, restoring the seamless api of your keyboard input.
APIPark is a high-performance AI gateway that allows you to securely access the most comprehensive LLM APIs globally on the APIPark platform, including OpenAI, Anthropic, Mistral, Llama2, Google Gemini, and more.Try APIPark now! 👇👇👇
Addressing Broader Keyboard Issues: When Individual Key Repair Isn't Enough
While many common key problems can be resolved with individual key repair, there are instances where the issue might be more widespread or indicative of a deeper problem. These situations often require more advanced troubleshooting and, potentially, the replacement of the entire keyboard assembly. This is where your understanding of the laptop's internal architecture, and perhaps even system management analogies, becomes particularly useful.
Cleaning the Entire Keyboard (Surface Level)
Even if only one key is malfunctioning, regular comprehensive cleaning can prevent future issues and improve the overall longevity of your keyboard. This is proactive maintenance, much like optimizing network traffic through an api gateway to prevent bottlenecks before they occur.
- Power Off and Unplug: Always start with a fully powered-off and unplugged laptop.
- Shake It Out (Gently): Close the laptop and gently turn it upside down, lightly tapping the back. This can dislodge larger crumbs and debris caught deep within the keyboard crevices.
- Compressed Air Sweep: Angle your compressed air can and systematically sweep across the entire keyboard, moving from one side to the other. Use short, powerful bursts to clear out dust and small particles from between and under all the keycaps.
- Wipe Down with IPA: Lightly dampen a lint-free cloth with 90%+ isopropyl alcohol. Gently wipe the surface of all keycaps and the areas between them. This removes skin oils, grime, and minor sticky residues, leaving your keyboard feeling fresh and clean. Avoid spraying IPA directly onto the keyboard.
Keyboard Backlight Issues
Some Flex 5 models feature a keyboard backlight, which can also encounter issues independently of key functionality.
- Function Key Check: Most laptops use a dedicated function key combination (e.g., Fn + Spacebar, Fn + F11, or Fn + F12) to toggle the backlight on/off and adjust brightness. Ensure you've tried these combinations.
- BIOS/UEFI Settings: Some laptops have backlight control settings within the BIOS/UEFI. Access these settings (as described in the software troubleshooting section) and check if the backlight is enabled or if there are any options to restore defaults.
- Driver Update: While less common, ensure your display drivers and potentially any specific keyboard utility drivers are up to date via the Lenovo support website.
- Hardware Failure: If none of the above resolve the issue, it could indicate a hardware failure of the backlight itself or its connection. This typically requires more advanced repair or professional service, as the backlight is often integrated directly into the keyboard assembly.
Removing and Replacing the Entire Keyboard Assembly (Advanced)
When multiple keys fail, keys in a specific region stop working, or liquid damage is extensive, replacing the entire keyboard assembly is often the most effective solution. This is a significantly more involved procedure, requiring the partial or full disassembly of your Flex 5. This process highlights the intricate relationship between various internal components and how they function as a cohesive system, with the motherboard acting as the central mcp (Main Control Panel) coordinating all peripheral inputs. The keyboard itself serves as the primary gateway for user commands, and if this gateway is compromised, replacing the entire module ensures a fresh, functional interface.
Important Pre-requisites: * Service Manual/Disassembly Guide: Absolutely essential. Find the specific service manual for your Flex 5 model on the Lenovo support website or a reputable third-party repair site. This will detail the exact screw locations, ribbon cable connections, and disassembly order. * Patience and Organization: There will be many screws and delicate connectors. Use your small container, potentially with labeled compartments, to keep track of every screw and component. * Anti-Static Precautions: Reiterate anti-static wrist strap usage.
General Steps (may vary significantly by Flex 5 model):
- External Disassembly:
- Power Off & Unplug: As always.
- Remove Bottom Cover: Locate and remove all screws securing the bottom cover. Use a plastic pry tool to gently release any clips holding it in place.
- Disconnect Battery: This is critical. Locate the battery connector on the motherboard and carefully disconnect it.
- Internal Component Removal (as needed):
- Depending on your Flex 5 model, the keyboard might be integrated into the top case (palm rest assembly) or be a separate component accessible after removing the motherboard.
- You might need to remove other components to gain access:
- Storage Drives (SSD/HDD): Carefully disconnect and remove.
- RAM Modules: Unclip and remove.
- Wireless Card: Disconnect antenna cables and remove the card.
- Cooling Fan/Heatsink: Disconnect fan cable and remove screws.
- Each component is connected to the mcp (motherboard) via specific connectors and secured with screws. Understanding this interconnectedness, where the mcp is the central processing unit and distribution hub for all data, is key to successful disassembly.
- Disconnecting the Keyboard Cable(s):
- The keyboard connects to the motherboard via one or two thin ribbon cables (flex cables). These are typically secured by small flip-up or pull-out latches.
- Carefully open the latch and gently pull the ribbon cable straight out. Be extremely cautious as these cables and their connectors are very fragile. The keyboard backlight, if present, will have its own separate ribbon cable.
- Removing the Keyboard Assembly:
- The keyboard itself might be secured by numerous small screws from the top or bottom, or by plastic rivets that need to be carefully melted/cut if replacing only the keyboard portion of the top case. If it's part of the top case, you'll be replacing the entire top case assembly.
- Once all screws and fasteners are removed, gently lift out the old keyboard assembly.
- Installing the New Keyboard Assembly:
- Carefully align the new keyboard assembly into its slot.
- Secure it with all the screws or fasteners you removed.
- Reconnect Ribbon Cables: This is a delicate step. Gently insert the keyboard ribbon cable(s) straight into their respective connectors on the motherboard. Ensure they are fully seated, then carefully close the latches to secure them. Improper connection here will result in a non-functional keyboard.
- Reassemble Internal Components: Reinstall all components you removed (wireless card, RAM, storage, cooling system, etc.), ensuring all cables are connected and screws are tightened.
- Reconnect Battery: Reconnect the battery cable to the motherboard.
- Reattach Bottom Cover: Secure the bottom cover with all its screws.
This deep dive into the laptop’s internals underscores the complexity of modern devices. Just as ensuring every physical connection within your Flex 5 is flawless for optimal performance, managing the connections and interactions between various software services is equally critical for robust applications. This is precisely the realm of an api gateway and management platform. A platform like APIPark, for instance, acts as a sophisticated gateway for over 100 AI models and REST services, simplifying their integration and deployment. It standardizes api formats, manages authentication, handles load balancing, and provides end-to-end lifecycle management. In essence, APIPark ensures that all your software services, much like your laptop's internal components, communicate seamlessly and efficiently, functioning as a cohesive system without requiring developers to manually manage every intricate connection point. It provides a robust and centralized api management system, much like the mcp of your laptop provides a central hub for all hardware interactions.
Post-Repair Testing and Maintenance
Congratulations on repairing your Flex 5's keyboard key! The job isn't quite done until you've thoroughly tested your work and implemented some preventative maintenance habits. This final stage ensures the repair is successful and helps to prolong the life of your keyboard, maintaining its status as a reliable gateway for all your computing needs.
Thorough Post-Repair Testing:
- Initial Power-On and Visual Check:
- After reassembling everything, plug in your Flex 5 and power it on.
- Observe the repaired key (or the entire keyboard if you replaced the assembly). Does it look correctly seated? Are there any visible gaps or misalignments?
- For backlit keyboards, check if the backlight functions correctly.
- Systematic Key Testing:
- Open a simple text editor (like Notepad, WordPad, or Google Docs). This allows you to see immediate feedback without complex software interfering.
- Test the Repaired Key: Press the problematic key multiple times. Does it respond every time? Does it produce the correct character? Does it feel consistent with other keys (tactile feedback, travel distance)?
- Test Surrounding Keys: It's good practice to test the keys immediately adjacent to the repaired one. This ensures no inadvertent damage occurred during the repair process.
- Test All Keys (Recommended for Full Keyboard Replacement): If you replaced the entire keyboard assembly, systematically press every single key. Go through the alphabet, numbers, symbols, function keys (F1-F12), and special keys (Ctrl, Alt, Shift, Tab, Enter, Spacebar). This comprehensive check verifies that all connections are secure and all keys are functioning as expected. Online keyboard test websites can also be helpful for this.
- Function Key Combinations: Test common function key combinations (e.g., Fn + F-keys for volume, brightness, Wi-Fi toggle, backlight control). These often rely on specific driver interactions and can confirm deeper functionality.
- Long-Term Observation: For the next few days or a week, pay close attention to the repaired key. Sometimes, an intermittent issue might not show up during initial testing but might resurface under specific usage patterns.
Regular Maintenance Routines:
Implementing a routine maintenance schedule for your Flex 5's keyboard can significantly reduce the likelihood of future key failures and extend its lifespan. Just as a well-managed api gateway requires continuous monitoring and updates, your physical input gateway benefits from regular care.
- Weekly/Bi-Weekly Compressed Air Blasts:
- Make it a habit to power off your laptop and give your keyboard a quick blast with compressed air once every week or two.
- Angle the can and sweep across the entire keyboard to dislodge dust and crumbs before they build up and become problematic. This is your primary defense against debris accumulation.
- Monthly Surface Cleaning:
- At least once a month, power off your laptop and gently wipe down the keycaps and surrounding areas with a lint-free cloth lightly dampened with 90%+ isopropyl alcohol. This removes skin oils, sweat, and minor smudges that accumulate over time.
- Avoid using harsh chemical cleaners, window cleaner, or anything abrasive, as these can damage the keycap finish or print.
- Mindful Eating and Drinking:
- The simplest solution to spills and food-related debris is to avoid eating and drinking directly over your laptop. If you must, ensure your beverages are in spill-proof containers and food crumbs are kept at a safe distance.
- Protective Keyboard Covers (Optional):
- Consider a thin, silicone keyboard cover, especially if you work in a dusty environment, have pets, or are prone to spills. These covers offer a physical barrier against debris and liquids. Ensure it's specifically designed for your Flex 5 model to guarantee a good fit and comfortable typing experience.
- Software Updates:
- Keep your Flex 5's operating system and drivers up to date. While less impactful for physical key issues, updated drivers ensure the keyboard's software interface (api) is running optimally, preventing software conflicts that could mimic hardware problems. Regularly check Lenovo's support website for specific driver updates for your model.
By integrating these testing and maintenance practices into your routine, you'll not only confirm the success of your current repair but also proactively safeguard your Flex 5's keyboard against future issues, ensuring a smooth and responsive typing experience for years to come.
When to Seek Professional Help
While many keyboard issues on your Flex 5 can be resolved with DIY repairs, there are situations where seeking professional assistance is the wisest course of action. Recognizing your limitations and knowing when to call in the experts can prevent further damage to your device and save you time and potential frustration.
Here are scenarios where professional help is highly recommended:
- Extensive Liquid Damage: If you've had a significant liquid spill that has seeped deep into the laptop's internals, professional intervention is often necessary. Liquids can cause widespread corrosion and short circuits affecting not just the keyboard but also the motherboard, battery, and other critical components. A professional can properly assess the extent of the damage, clean all affected parts, and replace components that are beyond repair. Attempting to fix severe liquid damage yourself without proper tools or expertise can lead to irreversible harm.
- Motherboard or Internal Circuitry Damage: If, after thorough troubleshooting (including testing in BIOS/UEFI), the keyboard remains unresponsive or exhibits very erratic behavior, and you suspect the issue lies with the motherboard's keyboard controller or its connections (the mcp that manages input from the keyboard gateway), it's best to consult a professional. Diagnosing and repairing motherboard-level issues requires specialized equipment (like multimeters and soldering tools) and advanced technical skills that most home users do not possess. Incorrectly attempting to troubleshoot these issues can lead to permanent damage to your laptop's core components.
- Beyond Your Comfort Level: If at any point during the repair process – whether it's removing stubborn screws, disconnecting delicate ribbon cables, or handling other internal components – you feel uncomfortable, unsure, or fear causing more damage, stop immediately. It's perfectly fine to recognize that a task is beyond your current skill set. A professional technician has the experience and training to handle complex disassembly and reassembly without risking your device.
- Warranty Considerations: If your Lenovo Flex 5 is still under warranty, attempting any internal repairs yourself could void that warranty. Before opening your laptop, check your warranty status and review Lenovo's terms and conditions. If the issue is covered, taking it to an authorized service center is the most cost-effective and safest option. Even if you have to pay a deductible, it might be cheaper than self-repair if something goes wrong.
- Lack of Specialized Tools or Replacement Parts: For advanced repairs like replacing the entire keyboard assembly, specific tools and genuine replacement parts are crucial. If you can't source the correct parts or lack the necessary precision tools, it's better to let a professional handle it. Using ill-fitting parts or improper tools can lead to a suboptimal repair or new problems.
- Time Constraints or High-Value Data: If you rely heavily on your Flex 5 for work or have extremely critical data on it (even with backups, downtime is costly), and you don't have the time to meticulously troubleshoot and repair, professional service offers a quicker and more reliable solution. Their expertise allows for efficient diagnosis and repair, minimizing your device's downtime.
A reputable computer repair shop or an authorized Lenovo service center will have the diagnostic tools, specialized equipment, and genuine parts needed to fix your Flex 5's keyboard issue correctly. They can also perform a more comprehensive check of your laptop to identify any underlying problems you might have missed. While DIY repairs are empowering and cost-effective for simple issues, knowing when to trust the experts is a hallmark of responsible device ownership.
Conclusion: Empowering Your Flex 5 with a Flawless Keyboard
The Lenovo Flex 5, with its dynamic capabilities and adaptable design, is a testament to modern computing innovation. However, the frustration of a malfunctioning keyboard key can quickly turn a powerful tool into a cumbersome burden, disrupting everything from simple web browsing to complex development tasks involving various api integrations. This guide has aimed to demystify the process of diagnosing and repairing these common issues, transforming a potentially intimidating problem into a manageable project.
We've traversed the intricate landscape of your Flex 5's keyboard, from the delicate dance of keycaps and retainer clips to the critical role of the rubber dome and underlying circuitry. We’ve equipped you with a methodical troubleshooting approach, distinguishing between software glitches and hardware malfunctions, and armed you with the essential tools and preparatory steps for a safe and effective repair. Through detailed, step-by-step instructions, you've learned how to meticulously clean, re-seat, and even replace individual key components, restoring that satisfying click and reliable input.
For those more challenging scenarios, we've explored the advanced steps of full keyboard assembly replacement, emphasizing the importance of detailed service manuals and the careful handling of internal components connected to the laptop's central mcp. This deeper dive into system integration also highlighted the parallels between hardware component management and the orchestration of complex software services. Just as ensuring every physical connection within your Flex 5 functions flawlessly, managing diverse software apis and services requires a robust solution. This is where an AI gateway and api management platform like APIPark becomes invaluable, streamlining the integration and deployment of hundreds of AI models and REST services, acting as a crucial gateway to simplify complex digital interactions.
Ultimately, maintaining your Flex 5's keyboard isn't just about fixing a broken part; it's about preserving the seamless api between you and your device. A fully functional keyboard ensures uninterrupted productivity, enhances your user experience, and extends the lifespan of your valuable laptop. By following the advice in this guide, you've not only saved money on potential repair costs but also gained a deeper understanding of your device, fostering a sense of self-reliance and empowerment. Keep your keyboard clean, be mindful of its vulnerabilities, and approach any future issues with the confidence that you possess the knowledge to bring your Flex 5 back to its optimal, responsive state. Happy typing!
Frequently Asked Questions (FAQs)
1. My Flex 5 key is stuck down after a liquid spill. What should I do first? Answer: First, immediately power off and unplug your Flex 5 to prevent further damage. Do not try to turn it on if it's already off. If possible, disconnect the internal battery (consult your service manual). Then, remove the keycap and use a lint-free cloth or cotton swab very lightly dampened with 90%+ isopropyl alcohol to meticulously clean any sticky residue from the rubber dome, the retainer clip, and the keycap itself. Allow everything to dry completely (several hours) before reassembling and testing. If the problem persists or the spill was extensive, professional help is recommended to prevent long-term corrosion.
2. Can I replace just one keycap or do I need to buy a whole new keyboard? Answer: For most Flex 5 models, you can absolutely replace just a single keycap and its corresponding retainer clip. These small parts are often sold individually or in small sets by specialized laptop parts retailers online. You only need to consider replacing the entire keyboard assembly if multiple keys are failing, keys in a specific region are unresponsive, or there's widespread damage (e.g., from a major liquid spill) that affects the underlying circuitry.
3. My key pops off frequently after I put it back on. What might be the issue? Answer: This usually indicates a problem with the retainer clip (scissor mechanism) or the keycap itself. Carefully remove the keycap again and thoroughly inspect the retainer clip for any bent, broken, or misaligned plastic tabs. Also, check the underside of the keycap for any damaged mounting points. If either component is compromised, it won't securely hold the keycap in place, causing it to pop off. Replacing the damaged retainer clip or keycap (or both) is typically the solution. Ensure the replacement parts are compatible with your specific Flex 5 model.
4. How do I know if my key issue is a software problem or a hardware problem? Answer: Start by performing software checks. Restart your laptop, update keyboard drivers in Device Manager, and most importantly, test the problematic key in Safe Mode and/or in your laptop's BIOS/UEFI settings. If the key works correctly in Safe Mode or BIOS/UEFI, the issue is almost certainly software-related (e.g., driver conflict, OS glitch). If the key does not work even in Safe Mode or BIOS/UEFI, it strongly points to a hardware problem requiring physical inspection or repair.
5. Is it safe to use compressed air to clean my keyboard? Answer: Yes, compressed air is generally safe and highly effective for cleaning keyboards, provided you use it correctly. Always hold the can upright to prevent liquid propellant from spraying onto your components. Use short, controlled bursts, and avoid directing a continuous stream for too long in one spot. Also, ensure your laptop is powered off when using compressed air. This method is excellent for dislodging dust, crumbs, and other dry debris from under and between keycaps.
🚀You can securely and efficiently call the OpenAI API on APIPark in just two steps:
Step 1: Deploy the APIPark AI gateway in 5 minutes.
APIPark is developed based on Golang, offering strong product performance and low development and maintenance costs. You can deploy APIPark with a single command line.
curl -sSO https://download.apipark.com/install/quick-start.sh; bash quick-start.sh

In my experience, you can see the successful deployment interface within 5 to 10 minutes. Then, you can log in to APIPark using your account.

Step 2: Call the OpenAI API.