Creating a Mulesoft Proxy: Step-by-Step Guide


In the intricate landscape of modern enterprise architecture, where data flows ceaselessly between diverse applications and services, the role of an API gateway has ascended from a mere architectural component to an indispensable strategic asset. Organizations worldwide are grappling with the complexities of managing, securing, and scaling their application programming interfaces (APIs), which serve as the very conduits of digital interaction. Among the prominent platforms facilitating this critical function, Mulesoft's Anypoint Platform stands out, offering robust capabilities for API lifecycle management, including the creation and deployment of powerful API proxies. This guide delves deeply into the practicalities of creating a Mulesoft proxy, providing a comprehensive, step-by-step walkthrough designed to empower developers and architects with the knowledge to build resilient, secure, and performant API solutions.
The digital economy thrives on connectivity, and APIs are the backbone of this interconnectedness. From mobile applications fetching real-time data to microservices communicating within a complex ecosystem, APIs are everywhere. However, exposing backend services directly can introduce significant risks and operational challenges. This is precisely where the concept of an API gateway becomes paramount. An API gateway acts as a single entry point for all API calls, insulating backend services from direct client interaction while providing a centralized hub for cross-cutting concerns such as security, routing, traffic management, and analytics. Mulesoft's Anypoint Platform, with its integrated gateway capabilities, offers a compelling solution for establishing such a robust layer.
This extensive guide will walk you through the entire process of setting up a Mulesoft proxy, from understanding its foundational principles to deploying and securing it with advanced policies. We will explore the nuances of Mulesoft's architecture, discuss best practices, and provide detailed insights into optimizing your API gateway for production environments. By the end of this journey, you will possess a profound understanding of how to leverage Mulesoft to craft a powerful proxy that not only safeguards your backend systems but also enhances the overall developer and consumer experience of your APIs.
The Strategic Importance of an API Gateway in Modern Architecture
Before we embark on the technical journey of building a Mulesoft proxy, it’s crucial to contextualize the strategic value that an API gateway brings to any enterprise. In an era dominated by cloud computing, microservices, and distributed systems, the sheer volume and diversity of APIs can become an unmanageable sprawl without proper governance. An API gateway centralizes control and introduces a critical layer of abstraction, offering a multitude of benefits that extend far beyond simple request forwarding.
Firstly, an API gateway significantly bolsters security. By acting as the sole entry point, it can enforce authentication, authorization, threat protection, and data encryption policies uniformly across all exposed APIs, shielding sensitive backend services from direct exposure to potential vulnerabilities. This centralized security management dramatically reduces the attack surface and simplifies compliance efforts. Without such a mechanism, each backend service would need to implement its own security measures, leading to inconsistencies, potential gaps, and a greatly increased operational burden.
Secondly, it provides unparalleled control over traffic management. Organizations can implement throttling, rate limiting, and circuit breaker patterns at the gateway level, preventing individual services from being overwhelmed by excessive requests. This not only ensures the stability and availability of backend systems but also allows for differentiated service levels based on consumer needs or subscription tiers. Imagine a scenario where a sudden surge of traffic targets a critical, resource-intensive backend service. Without a gateway to manage and prioritize requests, this service could quickly collapse, leading to widespread system outages.
Thirdly, an API gateway is instrumental in simplifying application development and consumption. Developers interacting with the API gateway are presented with a unified, clean interface, abstracted away from the complex internal architecture of the backend services. This fosters agility, allowing backend services to evolve independently without impacting external consumers. Moreover, the gateway can handle data transformations, protocol translations, and response caching, further optimizing performance and streamlining integration efforts. This separation of concerns means that frontend developers don't need to worry about the specifics of multiple backend technologies; they simply interact with the well-defined API exposed by the gateway.
Lastly, it offers invaluable insights through centralized monitoring and analytics. All API traffic passing through the gateway can be logged, monitored, and analyzed, providing a holistic view of API usage, performance, and potential issues. This data is critical for informed decision-making, capacity planning, and proactive problem resolution. Such comprehensive visibility is virtually impossible to achieve when APIs are exposed directly from disparate backend services.
In essence, an API gateway is more than just a technical component; it is an architectural paradigm that enables enterprises to manage their digital assets with greater security, efficiency, and agility. Mulesoft's Anypoint Platform empowers organizations to build and manage such robust API gateways, making it a cornerstone for any enterprise striving for digital excellence.
Understanding Mulesoft's Approach to API Gateways and Proxies
Mulesoft's Anypoint Platform is a comprehensive solution for API-led connectivity, designed to help organizations integrate applications, data, and devices, both on-premises and in the cloud. At its core, Mulesoft leverages the concept of an API-led architecture, promoting the reuse and discoverability of assets through a layered approach of System APIs, Process APIs, and Experience APIs. The API gateway functionality within Anypoint Platform plays a pivotal role in this architecture, particularly through the deployment of API proxies.
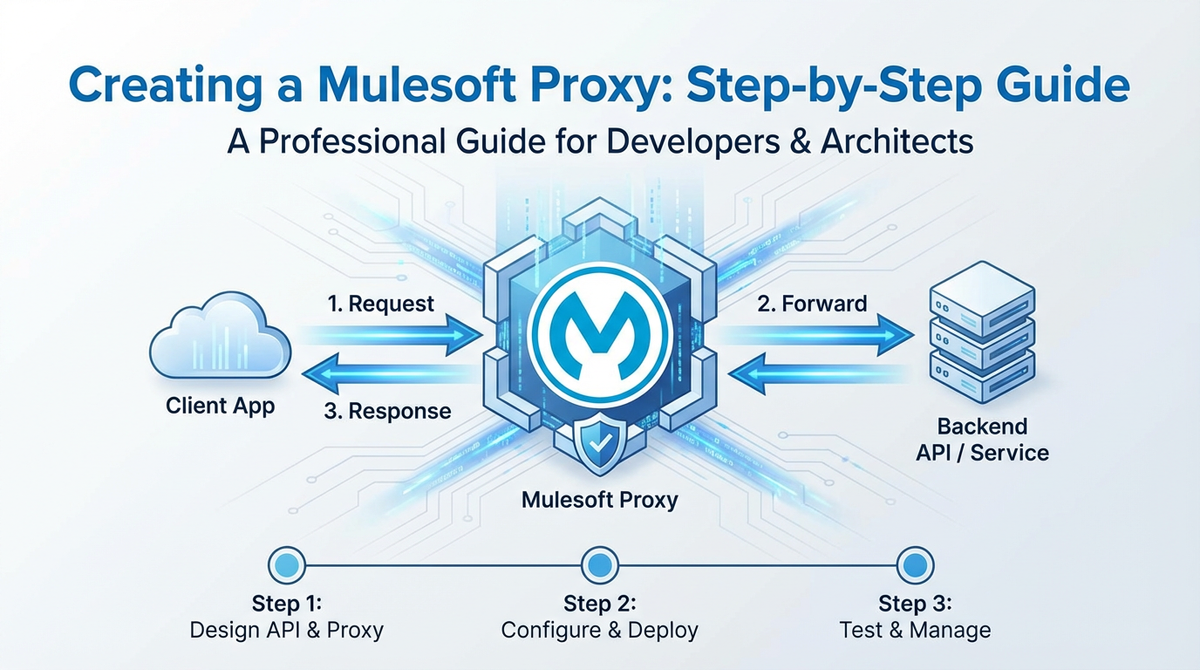
A Mulesoft proxy is essentially a specialized Mule application that acts as an intermediary between an API consumer and a backend API implementation. It doesn't contain the actual business logic of the backend service; instead, it forwards requests to the backend, captures responses, and applies various policies and transformations in between. This separation of concerns is fundamental to the gateway pattern.
The Anypoint Platform provides two primary ways to implement API proxies: 1. Proxying an Existing API: This is the most common scenario, where you have a backend service (e.g., a REST service, a SOAP service, or even another Mule application) and you want to expose it through Mulesoft's API gateway with added security, governance, and management capabilities. Mulesoft automatically generates a basic proxy application that you can then customize. 2. Developing a Full-fledged API with Gateway Capabilities: While still acting as a proxy in many ways, this approach involves building a complete Mule application that might also contain some orchestration or transformation logic before calling backend services. This guide will focus more on the former, demonstrating how to create a simple yet effective proxy.
The power of Mulesoft's API gateway lies in its ability to apply API gateway policies dynamically. These policies are pre-built or custom rules that can be attached to an API instance in Anypoint Platform's API Manager. They provide capabilities such as: * Security: Client ID enforcement, OAuth 2.0, JWT validation, IP allow/deny list. * Quality of Service (QoS): Rate limiting, throttling, spike arrest, caching. * Traffic Management: Routing, load balancing, header injection. * Transformation: Message transformation, content-based routing. * Monitoring: Custom metrics, logging.
By centralizing these concerns at the gateway level, Mulesoft enables organizations to decouple these cross-cutting functionalities from the backend services, leading to cleaner, more maintainable code and a consistent API experience across the enterprise. This approach aligns perfectly with the microservices paradigm, where individual services focus solely on their business domain, while the gateway handles the shared operational aspects.
In the following sections, we will walk through the practical steps of leveraging Anypoint Platform to establish such an API gateway using a Mulesoft proxy, ensuring that your backend services are exposed securely and efficiently.
Prerequisites for Creating a Mulesoft Proxy
Before diving into the hands-on creation of a Mulesoft proxy, it's essential to ensure you have the necessary tools and access rights in place. Setting up your environment correctly will prevent common roadblocks and allow for a smooth development and deployment experience.
Here’s a detailed list of what you'll need:
- Anypoint Platform Account:
- Purpose: This is Mulesoft's cloud-based platform where you manage your APIs, deploy applications, configure policies, and monitor their performance. It's the central hub for the entire API lifecycle.
- Requirement: You'll need an active Anypoint Platform account. If you don't have one, you can sign up for a free trial account on the Mulesoft website. Ensure you have administrator privileges or sufficient permissions to create API instances, deploy applications, and manage policies.
- Anypoint Studio:
- Purpose: Anypoint Studio is Mulesoft's Eclipse-based integrated development environment (IDE) specifically designed for building Mule applications. It provides a visual development interface, allowing you to drag-and-drop connectors and components to design your integration flows.
- Requirement: Download and install the latest stable version of Anypoint Studio. It typically comes bundled with a compatible Java Development Kit (JDK), but it's good practice to ensure you have Java 8 or newer installed and configured correctly on your system. You can download Anypoint Studio from the Mulesoft website after logging into your Anypoint Platform account.
- Maven (Optional but Recommended):
- Purpose: Maven is a build automation tool used primarily for Java projects. While Anypoint Studio handles basic project builds internally, Maven is crucial for more advanced scenarios, CI/CD pipelines, and managing project dependencies.
- Requirement: Install Maven on your system and ensure it's configured in your system's PATH. Anypoint Studio projects are Maven-enabled by default, making it seamless to use for building and deploying.
- A Backend API to Proxy:
- Purpose: To demonstrate the proxy functionality, you'll need an existing service to act as your backend API. This could be a simple mock REST service, a publicly available test API, or one of your own internal services.
- Requirement: For the purpose of this guide, we'll assume a simple public REST API that returns some data (e.g.,
https://jsonplaceholder.typicode.com/posts/1for a single post orhttps://jsonplaceholder.typicode.com/postsfor a list of posts). Make sure this API is accessible from where your Mule application will be deployed (e.g., from your local machine if deploying locally, or from CloudHub if deploying to the cloud).
- Postman or cURL:
- Purpose: These tools are essential for testing your deployed API gateway and verifying that the proxy is functioning correctly and that policies are being enforced.
- Requirement: Install Postman (a popular API client) or have access to a command-line interface with
curlinstalled. Both allow you to send HTTP requests to your API endpoint and inspect the responses.
With these prerequisites in place, you are well-equipped to embark on the journey of creating and managing a Mulesoft proxy, effectively transforming your Mulesoft environment into a powerful API gateway. The next step will involve setting up your Anypoint Studio and initiating the project that will become our API gateway.
Step 1: Defining Your Backend API (The Target Service)
Before constructing our Mulesoft proxy, we must first identify and understand the backend API it will protect and manage. The proxy's fundamental role is to act as an intermediary, forwarding requests to this target service and relaying its responses back to the client. For the sake of this guide, we will use a widely accessible public mock API provided by JSONPlaceholder, which offers fake online REST APIs for testing and prototyping.
Our chosen backend API will be: https://jsonplaceholder.typicode.com/posts
This endpoint, when accessed via a GET request, returns an array of 100 post objects, each containing an ID, user ID, title, and body. It's a simple, stateless RESTful API, making it an ideal candidate for demonstrating the core functionality of a Mulesoft proxy without introducing unnecessary complexities related to authentication or intricate data structures at the backend level.
Let’s briefly examine what a typical response from this API looks like for a single post (e.g., https://jsonplaceholder.typicode.com/posts/1):
{
  "userId": 1,
  "id": 1,
  "title": "sunt aut facere repellat provident occaecati excepturi optio reprehenderit",
  "body": "quia et suscipit\nsuscipit recusandae consequuntur expedita et cum\nreprehenderit molestiae ut ut quas totam\nnostrum rerum est aut sapiente dolor sit amet et rerum ipsum"
}
Key Characteristics of the Backend API:
- Endpoint:
https://jsonplaceholder.typicode.com/posts - Method: GET (for retrieving all posts or a specific post by ID)
- Data Format: JSON
- Security: No authentication required (for simplicity, but a real-world scenario would often involve backend security).
- Purpose: Provides a collection of sample blog posts.
Understanding this backend API is crucial because the Mulesoft proxy will be configured to faithfully replicate its functionality while layering additional management and security features on top. The proxy will listen for incoming requests, forward them to this jsonplaceholder endpoint, and then transmit the received responses back to the original caller. This transparent forwarding is the essence of a simple proxy.
In a real-world enterprise scenario, this backend API could be anything from: * A legacy SOAP service running on an antiquated server. * A modern microservice deployed in a Kubernetes cluster. * A third-party SaaS API that you wish to standardize and secure. * Another Mulesoft application or internal API.
The beauty of the API gateway pattern is its ability to abstract away the specifics of the backend implementation, allowing the gateway to present a consistent interface regardless of the underlying technology or complexity. With our target API clearly defined, we are now ready to begin constructing the Mulesoft proxy within Anypoint Studio.
Step 2: Creating a New Mule Project in Anypoint Studio
With your backend API identified and Anypoint Studio installed, the next logical step is to create a new Mule project. This project will house the configuration and logic for our API gateway proxy.
- Launch Anypoint Studio:
- Open Anypoint Studio from your applications menu. You might be prompted to select a workspace. Choose a suitable directory for your Mulesoft projects.
- Create a New Mule Project:
- Once Studio is loaded, go to
File > New > Mule Project. - The "New Mule Project" dialog will appear.
- Project Name: Enter a descriptive name for your project, something like
jsonplaceholder-proxy-api-gateway. This name will also be used as the application name when deployed to CloudHub. - Location: (Optional) You can change the default workspace location if needed.
- Runtime Version: Ensure you select the latest stable Mule Runtime version available in your Studio (e.g., Mule 4.4.0 or newer). This dictates the version of the Mule engine that will execute your application.
- Project Type: Leave it as "Mule Application".
- Click
Finish.
- Once Studio is loaded, go to
- Explore the Project Structure:
- Anypoint Studio will now create the project and open it in the Package Explorer. You'll see a basic project structure:
src/main/mule: This directory will contain your main Mule configuration files (XML files). By default, Studio creates a file namedjsonplaceholder-proxy-api-gateway.xml. This is where you'll design your integration flows.src/main/resources: For properties files, log4j configurations, and other resources.src/test/muleandsrc/test/resources: For your MUnit test configurations.pom.xml: The Maven Project Object Model file, defining project dependencies, build plugins, and deployment configurations.
- Anypoint Studio will now create the project and open it in the Package Explorer. You'll see a basic project structure:
- Initial Flow (Empty Canvas):
- When the project is created, Anypoint Studio typically opens the default XML file (
jsonplaceholder-proxy-api-gateway.xml) in the graphical design view. Initially, this canvas will be empty, waiting for you to drag and drop components to build your flow.
- When the project is created, Anypoint Studio typically opens the default XML file (
At this point, you have a foundational Mule project, ready to be populated with the logic that will transform it into an API gateway proxy. This project will serve as the vessel for intercepting incoming API requests, forwarding them to our backend jsonplaceholder service, and returning the responses. The next step will involve configuring the core components of this proxy, namely the HTTP Listener to receive requests and the HTTP Requester to forward them.
Step 3: Implementing the Core Proxy Logic
Now that we have our Mule project set up, it's time to imbue it with the fundamental logic that enables it to act as an API gateway proxy. This involves configuring an inbound endpoint to receive requests and an outbound endpoint to forward them to the backend API.
We will use two primary components from the Mule Palette: 1. HTTP Listener: To expose our proxy API and listen for incoming HTTP requests. 2. HTTP Request: To make an outbound HTTP call to our backend jsonplaceholder API.
Let's build the flow:
3.1 Configure the HTTP Listener (Inbound Endpoint)
The HTTP Listener is the entry point for our proxy. It defines the path and port on which our API gateway will receive requests from clients.
- Drag and Drop an HTTP Listener:
- From the Mule Palette on the right side of Anypoint Studio, search for "HTTP Listener" and drag it onto the empty canvas in your
jsonplaceholder-proxy-api-gateway.xmlfile. This will create a new flow.
- From the Mule Palette on the right side of Anypoint Studio, search for "HTTP Listener" and drag it onto the empty canvas in your
- Configure the Listener:
- Select the Listener component on the canvas. In the "Properties" panel at the bottom:
- Connector Configuration: Click the green "+" icon next to "Connector configuration" to create a new HTTP Listener configuration.
- Name:
HTTP_Listener_config(default is fine). - Protocol:
HTTP - Host:
0.0.0.0(This binds the listener to all available network interfaces, making it accessible externally). - Port:
8081(This is the port your proxy will listen on. Ensure it's not in use by another application on your local machine. For CloudHub deployments, this port will be abstracted). - Click
OK.
- Name:
- Path:
/api/*(This defines the base path for your proxy. The*acts as a wildcard, meaning any path segment after/api/will be captured and forwarded. For example, requests to/api/postsor/api/posts/1will be handled by this listener). - Allowed methods:
GET(For ourjsonplaceholderAPI, we'll primarily use GET requests. In a more complex gateway, you might allowPOST,PUT,DELETE, etc.).
- Connector Configuration: Click the green "+" icon next to "Connector configuration" to create a new HTTP Listener configuration.
- At this point, your proxy is ready to receive requests on
http://localhost:8081/api/*.
- Select the Listener component on the canvas. In the "Properties" panel at the bottom:
3.2 Configure the HTTP Request (Outbound Endpoint)
The HTTP Request component is responsible for making the actual call to our backend API (https://jsonplaceholder.typicode.com/posts).
- Drag and Drop an HTTP Request:
- From the Mule Palette, search for "HTTP Request" and drag it immediately after the "Listener" component in your flow.
- Configure the HTTP Request:
- Select the HTTP Request component. In the "Properties" panel:
- Connector Configuration: Click the green "+" icon next to "Connector configuration" to create a new HTTP Request configuration.
- Name:
HTTP_Request_configuration(default is fine). - Protocol:
HTTPS(since our backend uses HTTPS). - Host:
jsonplaceholder.typicode.com - Port:
443(default for HTTPS, can be left blank as Mule will infer it). - Click
OK.
- Name:
- Method:
#[attributes.method](This is a DataWeave expression that dynamically picks up the HTTP method from the incoming request. So if the client sends a GET request, the proxy will also send a GET request to the backend). - Path:
#[attributes.requestPath](This is crucial for a proxy. It uses a DataWeave expression to capture the remaining path from the incoming request (e.g.,/postsor/posts/1from/api/postsor/api/posts/1) and forwards it to the backend. This ensures the proxy is transparent to the client in terms of API paths). - Query Parameters: Click the
fxbutton next to "Query parameters" to open the DataWeave editor. Enter#[attributes.queryParams]to forward all incoming query parameters directly to the backend. This ensures parameters like?userId=1are passed through.
- Connector Configuration: Click the green "+" icon next to "Connector configuration" to create a new HTTP Request configuration.
- Select the HTTP Request component. In the "Properties" panel:
3.3 Add a Logger (Optional, but Good Practice)
Adding a Logger component can be very helpful for debugging and understanding what's happening within your flow.
- Drag and Drop a Logger:
- From the Mule Palette, search for "Logger" and drag it after the HTTP Request component.
- Configure the Logger:
- Select the Logger. In the "Properties" panel:
- Message:
#[payload](This will log the entire response received from the backend API after the HTTP Request component has executed).
- Message:
- Select the Logger. In the "Properties" panel:
The Complete Flow
Your completed flow should now look something like this in Anypoint Studio:
HTTP Listener -> HTTP Request -> Logger
This flow represents the simplest form of an API gateway proxy. It receives any HTTP request on /api/*, forwards it with the original method, path, and query parameters to https://jsonplaceholder.typicode.com, logs the backend response, and then sends that response back to the original client.
3.4 Error Handling (Robustness for your Gateway)
A robust API gateway must gracefully handle errors, whether they originate from the backend API or from internal proxy issues. Without explicit error handling, any error can cause the entire flow to fail abruptly, potentially returning unhelpful or even sensitive error messages to the client.
- Drag and Drop an On Error Propagate Scope:
- From the Mule Palette, search for "On Error Propagate" and drag it onto the
Error Handlingsection (usually at the bottom) of your flow.
- From the Mule Palette, search for "On Error Propagate" and drag it onto the
- Configure the On Error Propagate:
- Select the
On Error Propagatescope. - Error Type: You can specify
ANYto catch all errors, or more specific types likeHTTP:CONNECTIVITYorMULE:UNKNOWN. For a general proxy,ANYis often a good starting point. - Inside the
On Error Propagatescope:- Set Payload: Drag a
Set Payloadcomponent into theOn Error Propagatescope.- Value:
#[error.description](This will set the payload to a descriptive error message from the Mule runtime).
- Value:
- Set HTTP Status: Drag a
Set HTTP Statuscomponent into theOn Error Propagatescope.- Status Code:
#[if (error.errorMessage.attributes.statusCode default 500) > 499 then 500 else 400]- This DataWeave expression attempts to retrieve the HTTP status code from the error message if it's available (e.g., from a backend service error). If the error status is 5xx, it defaults to 500 (Internal Server Error) to hide internal backend details; otherwise, it defaults to 400 (Bad Request) for client-side issues. If no status code is available, it defaults to 500. This ensures a meaningful HTTP status is returned.
- Status Code:
- Logger: Add another
Loggerinside the error handler to log the error details:- Message:
An error occurred: #[error.description] - #[error.detailedDescription](This will provide detailed error logging for debugging purposes).
- Message:
- Set Payload: Drag a
- Select the
This error handling mechanism ensures that even if the backend API is unavailable or returns an error, our proxy will catch it, log it, transform the error message into a user-friendly format, and return an appropriate HTTP status code, thereby enhancing the robustness of our API gateway.
With the core logic and error handling in place, your Mule application is now functionally ready to act as an API gateway proxy. The next step is to deploy this application to a Mule runtime, making it accessible to external clients.
Step 4: Deploying the Proxy Application
Once the proxy logic is implemented in Anypoint Studio, the next critical step is to deploy the application to a Mule runtime environment. Mulesoft offers various deployment targets, but the most common for cloud-based API gateway solutions are CloudHub (Mulesoft's managed cloud runtime) and on-premise/hybrid runtimes. For this guide, we will focus on deploying to CloudHub, as it simplifies infrastructure management and offers seamless integration with Anypoint Platform's API Manager.
4.1 Deploying to CloudHub from Anypoint Studio
Anypoint Studio provides a convenient way to deploy your Mule application directly to CloudHub.
- Prepare for Deployment:
- Save all your changes in Anypoint Studio (
File > Save All). - Right-click on your project in the Package Explorer (
jsonplaceholder-proxy-api-gateway). - Select
Anypoint Platform > Deploy to CloudHub.
- Save all your changes in Anypoint Studio (
- CloudHub Deployment Dialog:
- A dialog box will appear, prompting you for CloudHub deployment settings.
- Anypoint Platform Credentials: If you haven't already logged in through Studio, you'll be prompted to enter your Anypoint Platform username and password.
- Target:
CloudHub(should be pre-selected). - Deployment Target:
- Application Name: This will default to your project name (e.g.,
jsonplaceholder-proxy-api-gateway). Crucially, this name must be globally unique across all CloudHub deployments. If it's not unique, you'll receive an error. Add a suffix like your initials or a random number (e.g.,jsonplaceholder-proxy-api-gateway-yourinitials). - Runtime Version: Select the same Mule Runtime version you configured your project with (e.g.,
4.4.0). - Worker Size: Choose a worker size. For a simple proxy,
0.1 vCoreis usually sufficient for development and testing. For production, you would select larger sizes (e.g.,0.2 vCore,1 vCore). - Workers:
1(For high availability in production, you might deploy 2 or more workers across different regions). - Region: Select the CloudHub region closest to your users or backend API (e.g.,
US East - N. Virginia).
- Application Name: This will default to your project name (e.g.,
- Properties: (Optional) You can define application properties here, such as environment-specific configurations. For our simple proxy, we don't need any special properties for now.
- Logging: (Optional) Adjust logging levels if needed.
- Initiate Deployment:
- Click the
Deploy Applicationbutton.
- Click the
- Monitor Deployment Status:
- Studio will start deploying your application. You can monitor the progress in the "Console" view in Studio.
- Alternatively, you can log in to your Anypoint Platform account, navigate to
Runtime Manager, and you will see your application listed with its deployment status (e.g., "Starting," "Running," or "Failed"). - Troubleshooting: If the deployment fails, check the logs in Runtime Manager for specific error messages. Common issues include non-unique application names, connectivity problems, or configuration errors in your Mule flow.
4.2 Verifying Deployment
Once your application status shows "Running" in Runtime Manager:
- Retrieve Application URL:
- In Runtime Manager, click on your deployed application (
jsonplaceholder-proxy-api-gateway-yourinitials). - Under the "Settings" tab, you will find the "Application URL". This is the public endpoint for your deployed proxy. It will typically be in the format:
http://[your-app-name].us-e1.cloudhub.io(or similar, depending on your region).
- In Runtime Manager, click on your deployed application (
- Test the Proxy:
- Open Postman or your web browser.
- Construct a GET request using your application URL and the path defined in your Listener (
/api/*). - Example URL:
http://jsonplaceholder-proxy-api-gateway-yourinitials.us-e1.cloudhub.io/api/posts/1 - Send the request. You should receive a JSON response identical to what you would get by directly calling
https://jsonplaceholder.typicode.com/posts/1. - Try with
http://jsonplaceholder-proxy-api-gateway-yourinitials.us-e1.cloudhub.io/api/poststo get all posts. - If you configured query parameters, test with
http://jsonplaceholder-proxy-api-gateway-yourinitials.us-e1.cloudhub.io/api/posts?userId=1.
Congratulations! You have successfully deployed a basic Mulesoft proxy to CloudHub, effectively establishing a functional API gateway that forwards requests to your backend API. At this stage, your proxy is transparent, merely passing requests and responses. The next crucial step is to register this deployed API with Anypoint Platform's API Manager to unlock its full potential for governance, security, and lifecycle management.
Step 5: Registering the API in Anypoint Platform API Manager
Deploying your Mule application is just one part of building a comprehensive API gateway. To truly leverage Mulesoft's capabilities for API governance, security, and analytics, you must register your deployed proxy as an API instance within Anypoint Platform's API Manager. This step transforms your running Mule application from a simple proxy into a managed API asset.
- Access API Manager:
- Log in to your Anypoint Platform account.
- From the main navigation menu, select
API Manager.
- Add a New API:
- Click on the
Add APIbutton. - From the dropdown, choose
New API.
- Click on the
- Configure API Details (First Page):
- API Name: Enter a descriptive name for your API (e.g.,
JSONPlaceholder Posts API). This is the logical name that consumers will see in the Exchange. - Asset Type:
REST API. - API Version:
v1(or whatever version you choose for your external API). - Asset ID: This will be auto-generated based on your API Name.
- API Instance Label:
1.0.0(or matching your API Version). - Click
Next.
- API Name: Enter a descriptive name for your API (e.g.,
- Configure Proxy Settings (Second Page):
- API Deployment Type: Select
Mule Gateway. This indicates that your API will be managed by a Mule runtime acting as an API gateway. - Deployment Target:
- Runtime: Choose
CloudHub. - Mule Application: From the dropdown list, select your deployed Mule application (e.g.,
jsonplaceholder-proxy-api-gateway-yourinitials). API Manager automatically detects running Mule applications that expose HTTP Listeners.
- Runtime: Choose
- Public Endpoint:
- Inbound URL: This will be automatically populated with the URL of your deployed CloudHub application, including the base path you defined in your HTTP Listener (e.g.,
http://jsonplaceholder-proxy-api-gateway-yourinitials.us-e1.cloudhub.io/api). This is the public API endpoint that consumers will use.
- Inbound URL: This will be automatically populated with the URL of your deployed CloudHub application, including the base path you defined in your HTTP Listener (e.g.,
- Backend Configuration:
- Backend URL: Enter the actual URL of your target backend API:
https://jsonplaceholder.typicode.com/posts. This tells the API gateway where to forward requests after processing them.
- Backend URL: Enter the actual URL of your target backend API:
- Click
Next.
- API Deployment Type: Select
- Review and Save:
- Review all the configurations.
- Click
Save & Deploy.
- Verify Gateway Status:
- After saving, API Manager will attempt to deploy and connect to your Mule application. You should see a "Gateway Status" indicator for your API instance.
- Initially, it might show "Activating" or "Pending." Wait for it to turn green and display "Active." This indicates that the API gateway is successfully linked to your deployed proxy and is ready to enforce policies.
The Significance of API Manager Registration
Registering your proxy in API Manager is a pivotal step for several reasons:
- Policy Enforcement: This is where you will define and apply various API gateway policies (security, QoS, etc.) to your API. These policies will be enforced by your deployed Mule application.
- Centralized Management: API Manager provides a single pane of glass to view and manage all your APIs, regardless of where they are implemented or deployed.
- Monitoring and Analytics: Once registered, API Manager can collect detailed analytics on API usage, performance, and errors, providing invaluable insights into your API ecosystem.
- Developer Portal (Exchange): Your managed API can be published to Anypoint Exchange, Mulesoft's developer portal, making it discoverable and consumable by internal and external developers. This is a key aspect of API lifecycle management and fostering API adoption.
With your API successfully registered and managed by API Manager, your Mulesoft proxy has evolved into a fully functional API gateway. The next exciting phase involves applying powerful policies to this gateway to enforce security, manage traffic, and enhance the overall reliability of your API.
APIPark is a high-performance AI gateway that allows you to securely access the most comprehensive LLM APIs globally on the APIPark platform, including OpenAI, Anthropic, Mistral, Llama2, Google Gemini, and more.Try APIPark now! 👇👇👇
Step 6: Applying Policies to the Proxy (Empowering Your API Gateway)
This is where the true power of Mulesoft's API gateway capabilities shines. By applying policies through API Manager, you can dynamically enforce various rules and behaviors on your deployed proxy without modifying its underlying code in Anypoint Studio. Policies provide a centralized, declarative way to manage cross-cutting concerns for your API landscape.
Let's explore some essential policies and demonstrate how to apply them to our JSONPlaceholder Posts API.
Accessing Policy Management
- Navigate to API Manager: Log in to Anypoint Platform and go to
API Manager. - Select Your API: Click on the
JSONPlaceholder Posts APIinstance you registered in the previous step. - Go to Policies: On the left-hand navigation pane for your API instance, click on
Policies.
6.1 Implementing a Client ID Enforcement Policy (Security First)
This is one of the most fundamental security policies for an API gateway. It ensures that only authorized applications with a valid client ID and client secret can access your API.
- Add Policy: Click on
Apply New Policy. - Select Policy: Choose
Client ID Enforcement. - Configure Policy:
- Headers:
client_idandclient_secret(default and standard). These are the HTTP headers the client must send. - Description: (Optional) Add a description.
- Click
Apply.
- Headers:
- Test the Policy (Failure Case):
- Open Postman.
- Make a GET request to your proxy URL (e.g.,
http://jsonplaceholder-proxy-api-gateway-yourinitials.us-e1.cloudhub.io/api/posts). - Do not include
client_idorclient_secretheaders. - You should receive a
401 Unauthorizedresponse with a message indicating missing credentials. This confirms the policy is working.
- Create a New Application in Anypoint Exchange (to get Client ID/Secret):
- In Anypoint Platform, go to
Exchange. - Search for and select your
JSONPlaceholder Posts API. - Click
Request access. - Application: Click
New application.- Application name:
TestClientApp - Description:
Application for testing client ID enforcement. - Click
Create.
- Application name:
- API Instance: Select your
JSONPlaceholder Posts API(v1). - SLA Tier: Choose
Unlimited(or a specific tier if configured). - Click
Request access. - After requesting access, navigate to
Exchange->My Applications->TestClientApp. - You will see the
Client IDandClient Secretfor this application. Copy them.
- In Anypoint Platform, go to
- Test the Policy (Success Case):
- In Postman, make the same GET request.
- Add two headers:
client_id: Paste the Client ID you copied.client_secret: Paste the Client Secret you copied.
- Send the request. You should now receive the successful JSON response from the
jsonplaceholderbackend.
This demonstrates how the API gateway effectively secures your API by only allowing authenticated clients.
6.2 Implementing a Rate Limiting Policy (Traffic Management)
Rate limiting is crucial for protecting your backend services from being overloaded by excessive requests and for providing fair usage for different consumers.
- Add Policy: Click
Apply New Policy. - Select Policy: Choose
Rate Limiting. - Configure Policy:
- Limit:
5(Allow 5 requests). - Time Period:
1(per 1 second). - Identifier:
Client ID(This means each unique client ID will have its own rate limit, preventing one client from consuming the limit of others). - Expose Headers:
true(Clients will seeX-RateLimit-Limit,X-RateLimit-Remaining,X-RateLimit-Resetheaders in the response). - Click
Apply.
- Limit:
- Test the Policy:
- In Postman, use your
TestClientAppcredentials (Client ID and Secret). - Rapidly send more than 5 GET requests to your proxy URL within a second.
- The first 5 requests should succeed.
- Subsequent requests within that second will receive a
429 Too Many Requestsresponse. - Observe the
X-RateLimit-Remainingheader in the responses; it will decrease with each successful request.
- In Postman, use your
6.3 Implementing a Caching Policy (Performance Optimization)
Caching significantly improves API performance by storing responses to frequently requested data, reducing the load on backend services and speeding up response times for clients.
- Add Policy: Click
Apply New Policy. - Select Policy: Choose
HTTP Caching. - Configure Policy:
- Cache TTL (Time To Live):
60(Cache responses for 60 seconds). - Cache Scope:
Individual client applications(This means each client ID will have its own cache, preventing one client from seeing stale data meant for another). - Cache Max Entries:
100(Maximum 100 unique entries to cache). - Cache key:
#[attributes.requestUri](Uses the full request URI as the cache key, so/posts/1and/posts/2are cached separately). - Methods to Cache:
GET(Only cache GET requests). - Click
Apply.
- Cache TTL (Time To Live):
- Test the Policy:
- In Postman, with your client credentials, make a GET request to
/api/posts/1. Note the response time. - Immediately make the same request again. The response time should be significantly faster, and the backend API will not have been called again (you can verify this by checking logs in Runtime Manager if you have detailed logging enabled).
- Wait for 60 seconds (the Cache TTL). Make the request again. It should be slower as the cache has expired, and a call to the backend will be made.
- In Postman, with your client credentials, make a GET request to
Other Powerful Policies
Mulesoft's API Manager offers a rich array of other policies: * Spike Arrest: Similar to rate limiting but focuses on preventing sudden, short bursts of traffic. * JSON Threat Protection: Protects against JSON-based attacks (e.g., excessively large payloads). * SLA Based Throttling: Applies different rate limits based on the Service Level Agreement (SLA) tier of the consuming application. * Message Transformation: Modifies request or response payloads (e.g., strip headers, change format). * IP Whitelist/Blacklist: Controls access based on client IP addresses.
Each policy adds a layer of intelligence and control to your API gateway, allowing you to fine-tune its behavior to meet specific security, performance, and governance requirements. The modular nature of these policies means you can combine them as needed, building a highly customized and robust API gateway solution without touching a single line of code in your core proxy application. This flexibility is a significant advantage of using Mulesoft as your API gateway.
Step 7: Testing the Proxy with Policies
After deploying your Mulesoft proxy and applying various policies through API Manager, comprehensive testing is paramount to ensure that your API gateway behaves as expected under different conditions. This step focuses on systematically verifying policy enforcement and general proxy functionality using an API client like Postman.
7.1 Reconfirming Basic Proxy Functionality
Before testing policies, always ensure the fundamental proxying works without any client authentication or rate limiting challenges.
- Basic GET Request:
- Use Postman to send a GET request to your CloudHub proxy URL, for instance:
http://jsonplaceholder-proxy-api-gateway-yourinitials.us-e1.cloudhub.io/api/posts. - Verify that you receive the expected list of posts from the
jsonplaceholderAPI. - Do the same for a specific post:
http://jsonplaceholder-proxy-api-gateway-yourinitials.us-e1.cloudhub.io/api/posts/1. - Check for correct HTTP status codes (e.g., 200 OK for success, 404 Not Found if you request a non-existent path that the backend handles).
- Use Postman to send a GET request to your CloudHub proxy URL, for instance:
7.2 Testing Client ID Enforcement
This policy verifies that only authenticated applications can access your API.
- Unauthorized Access Attempt:
- Send a GET request to your proxy URL without including the
client_idandclient_secretheaders. - Expected Result: You should receive a
401 UnauthorizedHTTP status code, and the response body will typically indicate that credentials are missing or invalid. This confirms the policy is active and correctly blocking unauthenticated requests.
- Send a GET request to your proxy URL without including the
- Authorized Access Attempt:
- Add the
client_idandclient_secretheaders (obtained from yourTestClientAppin Anypoint Exchange) to your GET request. - Expected Result: The request should succeed, returning the expected data from the
jsonplaceholderAPI (HTTP 200 OK). This confirms valid credentials bypass the enforcement.
- Add the
7.3 Testing Rate Limiting
This policy verifies that your API gateway can prevent individual clients from overwhelming the backend API with too many requests in a short period.
- Exceeding the Limit:
- Ensure your
client_idandclient_secretheaders are present. - Rapidly send more requests than your configured
Limitwithin theTime Period(e.g., more than 5 requests within 1 second if your limit is 5 req/sec). - Expected Result: The first
Limitnumber of requests (e.g., 5) should succeed with HTTP 200 OK. Subsequent requests within the time window should receive a429 Too Many RequestsHTTP status code. - Observe the response headers:
X-RateLimit-Limit,X-RateLimit-Remaining, andX-RateLimit-Resetshould be present and reflect the rate limit status.
- Ensure your
- Respecting the Limit:
- Wait for the
X-RateLimit-Resettime to pass. - Send a new request. It should succeed (HTTP 200 OK), indicating the limit has reset. This confirms the policy accurately manages the request quota.
- Wait for the
7.4 Testing HTTP Caching
This policy verifies that your API gateway can improve performance by serving cached responses and reducing calls to the backend.
- First Request (Cache Miss):
- Using your client credentials, send a GET request to a specific endpoint, e.g.,
/api/posts/1. - Expected Result: The request should succeed. Note the response time. This is the initial call to the backend API.
- Using your client credentials, send a GET request to a specific endpoint, e.g.,
- Subsequent Request (Cache Hit):
- Immediately send the exact same GET request again.
- Expected Result: The response time should be significantly faster than the first request. The response should be identical, and importantly, the API gateway should serve it from its cache, not by calling the
jsonplaceholderbackend. (You can confirm this by observing the logs in Anypoint Runtime Manager, where you'll see fewer calls to theHTTP Requestcomponent).
- Cache Expiration:
- Wait for the configured Cache TTL (e.g., 60 seconds).
- Send the exact same GET request again.
- Expected Result: The response time should be similar to the first request (a bit slower), as the cache entry has expired, forcing the API gateway to fetch data from the backend again.
7.5 Testing Error Handling
This verifies that your custom error handling logic in the Mule flow works as expected, providing graceful error messages.
- Backend Unavailability (Simulated):
- While you can't easily turn off
jsonplaceholder.typicode.com, you can modify your HTTP Request connector configuration in Studio to point to a non-existent host (e.g.,nonexistent.example.com). Redeploy the application. - Send a GET request to your proxy.
- Expected Result: Instead of a generic Mule error, you should receive a custom error message set by your
On Error Propagatescope (e.g.,error.description) and an appropriate HTTP status code (e.g.,500 Internal Server Error). This confirms your error handler gracefully captures and processes backend connectivity issues. Remember to revert the change to the correct backend URL after this test.
- While you can't easily turn off
Through these systematic tests, you gain confidence that your Mulesoft proxy, acting as a robust API gateway, is not only correctly forwarding requests but also diligently enforcing the governance, security, and performance policies you've applied. This thorough verification is a critical step before promoting your API to higher environments or making it available to a broader audience.
Advanced Mulesoft Proxy Configurations
While our basic proxy successfully routes requests, the true power of Mulesoft as an API gateway lies in its advanced configuration options. These features allow you to build highly sophisticated, resilient, and intelligent API proxies that cater to complex enterprise requirements.
8.1 Data Transformation with DataWeave
A common requirement for an API gateway is to transform request or response payloads to meet specific consumer or backend expectations. This could involve changing data formats (e.g., XML to JSON), restructuring JSON objects, or enriching data. Mulesoft's DataWeave is a powerful, functional programming language specifically designed for data transformation, and it's an integral part of the Mule runtime.
- Use Case: Imagine your backend API returns a large JSON object, but your mobile application only needs a subset of fields. You can use DataWeave in your proxy to filter out unnecessary data, reducing payload size and improving mobile app performance.
- Implementation: Insert a
Transform Messagecomponent (DataWeave) into your flow, either before theHTTP Request(for request transformation) or after (for response transformation). ```xml<![CDATA[%dw 2.0 output application/json
// Example: Selecting only 'id' and 'title' from each post payload map ( post -> { id: post.id, title: post.title })]]> `` This example transforms the array of posts, returning only theidandtitle` for each. This can significantly reduce bandwidth and processing overhead for clients.
8.2 API Versioning Strategies
As your APIs evolve, managing different versions becomes crucial to maintain backward compatibility and support multiple client bases. An API gateway is the ideal place to implement versioning strategies.
- URI Versioning: The most common approach, where the version is part of the URL path (e.g.,
/api/v1/posts,/api/v2/posts). You can use separate HTTP Listeners with different paths or DataWeave expressions to route to different backend versions based on the incoming URI. - Header Versioning: The client sends a custom header (e.g.,
X-API-Version: 1.0). Your proxy can inspect this header and route accordingly. - Query Parameter Versioning: The version is passed as a query parameter (e.g.,
/api/posts?version=1).
By implementing versioning at the API gateway, you can seamlessly manage transitions between API iterations, ensuring that older clients continue to function while new clients can leverage the latest features.
8.3 Load Balancing to Backend Instances
For highly available and scalable backend services, you often have multiple instances of the same service running. An API gateway can intelligently distribute incoming requests across these instances.
- Use Case: If you have
backend-service-A-instance-1andbackend-service-A-instance-2, the proxy can use a round-robin or least-connections algorithm to spread the load. - Implementation: In Mulesoft, this can be achieved using the
Round Robinrouter or configuring multipleHTTP Requestconnectors within aScatter-GatherorChoicerouter, along with logic to select the target based on availability or performance metrics. More advanced load balancing can be handled at the infrastructure level (e.g., within CloudHub or your load balancer preceding the Mule runtime).
8.4 Circuit Breaker Pattern for Resilience
The Circuit Breaker pattern is a crucial resilience strategy for distributed systems. It prevents a failing backend service from cascading failures throughout your system by quickly failing requests to that service once a certain error threshold is met, rather than repeatedly attempting to call it.
- Use Case: If your
jsonplaceholderbackend suddenly becomes unresponsive, the circuit breaker would detect this, "trip" open, and immediately return an error to the client for subsequent requests, without even attempting to call the backend. After a configurable "reset" period, it would allow a few test requests to see if the backend has recovered. - Implementation: Mulesoft offers an
Error Handlingscope (specificallyTryscope withon-error-propagate) combined with custom logic or more advanced connectors (if available in an Enterprise Integration Patterns module) to implement circuit breaker functionality. Alternatively, for simpler scenarios, Mulesoft'sUntil Successfulscope can be configured with a retry strategy, which can act as a basic form of resilience. For full-fledged circuit breaker patterns, external libraries or dedicated components may be integrated, or specific policies for API gateways that offer this are preferred.
8.5 Custom Policies and Extensions
While Mulesoft's API Manager offers a rich set of out-of-the-box policies, you might encounter scenarios requiring highly specialized logic. Mulesoft allows you to create custom policies using Java or Mule flows, extending the API gateway's capabilities.
- Use Case: Implementing a unique authentication scheme, integrating with a proprietary logging system, or performing complex dynamic routing based on custom header values not covered by standard policies.
- Implementation: Custom policies are developed as separate Mule projects, packaged as JARs, and then uploaded to Anypoint Platform's Exchange. Once published, they can be applied to API instances in API Manager just like standard policies.
These advanced configurations transform a basic Mulesoft proxy into a sophisticated API gateway, capable of handling diverse and demanding enterprise API management requirements. They allow for fine-grained control over routing, payload manipulation, fault tolerance, and API lifecycle management, making Mulesoft a powerful platform for building resilient and scalable API ecosystems.
Security Considerations for API Gateways
The API gateway stands at the forefront of your backend services, making it the primary line of defense against malicious attacks and unauthorized access. Therefore, implementing robust security measures is not merely an option but a critical imperative for any production-grade API gateway. Mulesoft's Anypoint Platform provides a comprehensive suite of features to secure your APIs.
9.1 Authentication and Authorization
- Client ID Enforcement: As demonstrated, this is the most basic form of authentication, ensuring only known applications can access the API. Mulesoft's policy handles validation of
client_idandclient_secretagainst registered applications in Exchange. - OAuth 2.0: For more sophisticated security, especially involving user identity, OAuth 2.0 is the industry standard. Mulesoft's API gateway can act as a resource server, validating OAuth tokens (e.g., Access Tokens) issued by an Authorization Server.
- Policy: Anypoint Platform offers an
OAuth 2.0 Token Enforcementpolicy, which can integrate with various OAuth providers (e.g., PingFederate, Okta, Azure AD, or a custom OAuth provider). This policy intercepts incoming requests, extracts the access token, and validates it with the configured Authorization Server before allowing the request to proceed to the backend.
- Policy: Anypoint Platform offers an
- JWT Validation: JSON Web Tokens (JWTs) are commonly used for transmitting claims securely between parties. The gateway can validate JWTs (checking signature, expiration, issuer, audience, etc.) to ensure the authenticity and integrity of the token.
- Policy: Mulesoft's
JWT Validationpolicy allows you to configure validation rules, including specifying the JWKS (JSON Web Key Set) URL to retrieve public keys for signature verification.
- Policy: Mulesoft's
- Basic Authentication: While less secure for modern web applications, Basic Auth might still be required for integrating with legacy systems. Mulesoft can enforce or convert Basic Auth credentials.
9.2 Threat Protection
- JSON Threat Protection: Malicious actors can send excessively large or deeply nested JSON payloads to consume server resources and trigger denial-of-service (DoS) attacks.
- Policy: The
JSON Threat Protectionpolicy allows you to set limits on JSON payload size, string length, array size, object depth, and number of keys, preventing these types of attacks.
- Policy: The
- XML Threat Protection: Similar to JSON, XML payloads can also be crafted to exploit vulnerabilities.
- Policy: Mulesoft provides an
XML Threat Protectionpolicy to guard against XML-based attacks (e.g., XML Bomb, DTD entity expansion).
- Policy: Mulesoft provides an
- Content Type Filtering: Ensure that the API gateway only accepts expected content types (e.g.,
application/json,text/xml), rejecting requests with unsupported or malicious content types. This can be configured in the HTTP Listener or with custom policies. - SQL Injection & Cross-Site Scripting (XSS) Prevention: While the API gateway primarily operates at the HTTP layer, it can play a role in preventing these attacks by performing basic input validation on query parameters, headers, and body content, though deep protection often requires backend validation. Custom DataWeave transformations or regex patterns can be used for rudimentary sanitization.
9.3 Data Encryption and Transport Security
- HTTPS/TLS Enforcement: All communication with the API gateway should occur over HTTPS to ensure data in transit is encrypted. CloudHub applications automatically provision TLS certificates, and you can configure custom certificates for custom domains.
- Mutual TLS (mTLS): For highly sensitive APIs, mutual TLS can be enforced. This requires both the client and the server (your API gateway) to present and validate certificates, providing strong client authentication in addition to encryption. Mulesoft gateways can be configured to require client certificates.
9.4 API Key Management
While Client ID Enforcement is a form of API key management, a comprehensive strategy often involves: * Lifecycle Management: Creating, revoking, and rotating API keys. Anypoint Platform's Exchange and API Manager provide capabilities for managing client applications and their associated keys. * Auditing: Tracking when API keys are used, by whom, and for which APIs. Mulesoft's detailed logging and analytics capabilities facilitate this. * Secure Storage: Ensuring that API keys (especially client secrets) are stored securely and not exposed in client-side code or unencrypted configuration files.
Securing your API gateway is a continuous process that requires a multi-layered approach. By leveraging Mulesoft's powerful policy engine and inherent security features, organizations can build a formidable defense for their APIs, protecting their valuable data and backend services from a wide array of threats. Regular security audits, penetration testing, and staying updated with the latest security best practices are also essential components of a robust API gateway security strategy.
Monitoring and Analytics for Mulesoft API Gateways
Deploying an API gateway is just the beginning; understanding how your APIs are performing, being consumed, and identifying potential issues is equally critical. Mulesoft's Anypoint Platform offers robust monitoring and analytics capabilities that provide deep insights into your API ecosystem. These tools are indispensable for proactive management, capacity planning, and ensuring service level agreements (SLAs).
10.1 Anypoint Monitoring
Anypoint Monitoring is a comprehensive suite of tools integrated within the Anypoint Platform, designed to provide real-time visibility and historical analysis of your Mule applications and APIs.
- Custom Dashboards: You can create personalized dashboards to visualize key metrics relevant to your API gateway, such as:
- Throughput: Requests per second (RPS) or transactions per second (TPS).
- Latency: Average, p95, p99 response times for your API.
- Error Rates: Percentage of failed requests, categorized by HTTP status code.
- Resource Utilization: CPU, memory usage of your CloudHub workers.
- Policy Violations: Metrics indicating how often specific policies (e.g., rate limiting) are triggered.
- Alerting: Configure alerts based on specific thresholds for any of the monitored metrics. For example, you can set up an alert if:
- Error rates exceed 5% within a 5-minute window.
- Latency for a critical API endpoint goes above 500ms for more than 1 minute.
- A CloudHub worker's CPU utilization stays above 80% for an extended period.
- Alerts can be sent via email, PagerDuty, Slack, or webhooks, ensuring your operations team is immediately notified of potential issues.
- Log Management: Anypoint Monitoring centralizes logs from all your deployed Mule applications. You can:
- Search and Filter: Easily search through logs using various criteria (application name, flow name, message content, timestamp).
- Analyze Logs: Identify patterns, troubleshoot errors, and gain context for specific transactions.
- Export Logs: For further analysis or compliance. This is especially useful for debugging issues within your API gateway proxy, as you can trace the flow of a request from the HTTP Listener through to the backend call and back.
10.2 API Manager Analytics
Beyond application-level monitoring, API Manager provides specialized analytics focused on API consumption and performance.
- API Usage Reports: Gain insights into:
- Top Consumers: Which applications or clients are consuming your APIs the most.
- Top APIs: Which APIs are most frequently called.
- Usage Trends: How API consumption changes over time (daily, weekly, monthly).
- Geographic Distribution: Where your API consumers are located.
- Performance Metrics: Detailed reports on:
- Average Response Time: End-to-end latency for each API endpoint.
- Success vs. Failure Rates: Understand the reliability of your APIs.
- Policy Enforcement Impact: See which policies are being triggered and their frequency (e.g., how many requests were blocked by rate limiting).
- Custom Reports: Create tailored reports to track specific business metrics related to API usage, which can inform product development and business strategy.
10.3 Integration with External Monitoring Systems
While Anypoint Monitoring and API Manager Analytics are powerful, many enterprises already have established monitoring and logging solutions (e.g., Splunk, ELK Stack, Datadog, Prometheus, Grafana). Mulesoft facilitates integration with these systems:
- Custom Log Appenders: Configure custom log4j appenders in your Mule applications to send logs to external log aggregation services.
- Metrics APIs: Mulesoft offers APIs to extract monitoring data, allowing you to feed it into external metrics databases or dashboards.
- CloudWatch Integration: For applications deployed on AWS, Mulesoft can integrate with AWS CloudWatch for metrics and logs.
By leveraging these comprehensive monitoring and analytics capabilities, you transform your Mulesoft API gateway from a mere traffic router into an intelligent observability hub. This ensures that you not only provide robust API services but also maintain full visibility into their health, performance, and usage, enabling proactive problem resolution and data-driven decision-making for your entire API ecosystem.
Comparison with Other API Gateways and the Role of APIPark
While Mulesoft's Anypoint Platform offers a robust and comprehensive solution for building and managing API gateways, it exists within a vibrant ecosystem of other gateway products and approaches. Understanding this landscape can help organizations choose the right tool for their specific needs.
Comparison with Other Commercial API Gateways:
| Feature/Platform | Mulesoft Anypoint Platform | Apigee (Google Cloud) | Kong Enterprise | AWS API Gateway |
|---|---|---|---|---|
| Primary Focus | Full API Lifecycle Mgmt, Integration, API-led Connectivity | API Management, Monetization, Analytics | Microservices API Gateway, Plugin-based Extensibility | Serverless API Gateway, AWS Ecosystem Integration |
| Deployment Model | CloudHub, On-Premise, Hybrid | Cloud (Google Cloud), On-Premise (Hybrid) | Cloud, On-Premise, Hybrid | Cloud (AWS Managed) |
| Integration | Strong integration with ESB/Integration flows | Strong analytics, developer portal | Flexible plugin architecture, open-source core | Deep integration with Lambda, DynamoDB, S3, etc. |
| Policy Mgmt | Robust policies via API Manager, custom policies | Extensive policies, traffic management, security | Rich plugin marketplace, custom plugins (Lua, Go) | Basic policies, Lambda authorizers, WAF integration |
| Target Audience | Enterprises needing holistic integration & API management | Large enterprises focused on API monetization & analytics | Microservices architects, dev teams needing high flexibility | AWS-centric organizations, serverless architectures |
| Complexity | Moderate to High (due to breadth) | Moderate to High | Moderate (plugin ecosystem can add complexity) | Moderate (can become complex with custom logic) |
| Cost | Enterprise-grade, typically higher | Enterprise-grade, usage-based, often higher | Enterprise-grade, also open-source option | Pay-per-use, scales economically with serverless |
This table provides a high-level overview. Each platform has its strengths and is often chosen based on existing infrastructure, strategic focus, and budget.
The Role of APIPark: An Open-Source Alternative and AI Gateway
In this diverse landscape, open-source solutions also play a significant role, offering flexibility, community support, and cost-effectiveness. One such emerging platform is APIPark.
APIPark positions itself as an all-in-one AI gateway and API developer portal, open-sourced under the Apache 2.0 license. While Mulesoft excels in enterprise-grade integration and comprehensive API lifecycle management, APIPark carves a niche by focusing on simplifying the integration and management of AI models alongside traditional REST services.
Here's how APIPark fits into the broader API gateway discussion and its distinct advantages:
- AI-Centric Gateway: Unlike many traditional gateways that primarily handle REST/SOAP, APIPark is built with AI integration in mind. It offers quick integration of over 100+ AI models with a unified management system for authentication and cost tracking. This is particularly valuable for organizations rapidly adopting AI into their applications.
- Unified API Format for AI Invocation: A significant pain point in AI integration is the diverse invocation formats of different AI models. APIPark standardizes the request data format, meaning changes in AI models or prompts don't affect the consuming application, drastically simplifying AI usage and maintenance.
- Prompt Encapsulation into REST API: This feature allows users to combine AI models with custom prompts to create new, specialized REST APIs (e.g., a sentiment analysis API, a translation API), accelerating the development of AI-powered services.
- Open-Source & Community Driven: Being open-source under Apache 2.0 provides transparency, flexibility, and the ability for developers to contribute and customize the platform to their exact needs, offering a cost-effective entry point for startups and smaller teams.
- Full API Lifecycle Management: Beyond AI, APIPark also offers end-to-end API lifecycle management, including design, publication, invocation, and decommissioning, similar to other robust API management platforms. It supports traffic forwarding, load balancing, and versioning.
- Performance: With performance rivaling Nginx (achieving over 20,000 TPS with modest resources), APIPark demonstrates its capability to handle large-scale traffic and supports cluster deployment, making it a viable option for demanding production environments.
- Team Collaboration and Multi-tenancy: Features like API service sharing within teams and independent API and access permissions for each tenant make it suitable for larger organizations with multiple departments or clients requiring isolated environments.
- Detailed Analytics: Like Mulesoft, APIPark provides comprehensive API call logging and powerful data analysis tools to track performance, troubleshoot issues, and gain long-term trends.
APIPark's focus on AI integration, combined with its open-source nature and robust API gateway features, makes it a compelling choice for organizations looking for an agile, cost-effective, and AI-ready API gateway and management platform. While Mulesoft caters to a broader enterprise integration landscape with its extensive ESB and iPaaS capabilities, APIPark offers a specialized, performant, and open-source alternative particularly attractive for AI-driven initiatives and teams prioritizing granular control and community-led development for their API infrastructure. In essence, the choice between platforms often comes down to the specific blend of integration needs, AI focus, operational scale, and the organization's preference for commercial support versus open-source flexibility.
Best Practices for Mulesoft Proxies in an API Gateway Context
Building a Mulesoft proxy is the first step; operating it effectively in a production environment as a core component of your API gateway requires adherence to best practices. These guidelines ensure optimal performance, security, and maintainability of your API assets.
- Follow API-Led Connectivity Principles:
- Layered Architecture: Design your APIs with System, Process, and Experience layers. Your proxies will often front Experience APIs, which expose data for specific consumer needs, while potentially invoking Process APIs, which orchestrate data, and System APIs, which interact directly with core systems. This promotes reusability and decouples concerns.
- Discoverability: Publish your APIs to Anypoint Exchange. This makes them easily discoverable and consumable by internal and external developers, fostering an ecosystem of reusable assets.
- Granular Policy Application:
- Apply Policies Strategically: Don't apply every policy to every API. Use policies judiciously based on the specific requirements of each API and endpoint. For instance, a public, read-only API might only need rate limiting, while a sensitive API for financial transactions will require robust authentication, threat protection, and auditing.
- Policy Tiers: Leverage SLA-based policies to offer different quality-of-service (QoS) levels to different consumers (e.g., higher rate limits for premium partners).
- Robust Error Handling:
- Standardized Error Responses: Ensure your API gateway returns consistent, informative, and standardized error messages (e.g., using problem JSON RFC 7807) to clients, regardless of the underlying backend error.
- Internal vs. External Errors: Mask internal system errors (stack traces, sensitive details) from external consumers. Log detailed error information internally for debugging.
- Circuit Breaker & Retries: Implement resilience patterns to gracefully handle backend failures and prevent cascading outages.
- Security from the Ground Up:
- Authentication & Authorization: Enforce appropriate authentication (Client ID, OAuth, JWT) and authorization mechanisms at the API gateway for every exposed API. Never rely solely on backend security.
- Threat Protection: Utilize policies like JSON/XML threat protection, IP allow/deny lists, and input validation to shield your backend from common attack vectors.
- TLS Everywhere: Ensure all communication to and from your API gateway uses HTTPS/TLS.
- Performance Optimization:
- Caching: Implement caching policies for frequently accessed, non-volatile data to reduce backend load and improve response times.
- Payload Optimization: Use DataWeave to transform and filter payloads, sending only necessary data to clients, especially for mobile applications.
- Worker Sizing: Monitor your CloudHub worker performance and scale worker size and count as needed to match your traffic load.
- Comprehensive Monitoring and Alerting:
- Real-time Visibility: Leverage Anypoint Monitoring and API Manager Analytics to gain real-time insights into API performance, usage, and errors.
- Proactive Alerts: Configure alerts for critical thresholds (e.g., high error rates, increased latency, worker CPU spikes) to enable rapid response to issues.
- Centralized Logging: Ensure all API gateway logs are aggregated and easily searchable for troubleshooting and auditing.
- Version Control and CI/CD Integration:
- Source Control: Store your Mule project files (including proxy configurations) in a version control system (e.g., Git).
- Automated Deployment: Integrate your Mulesoft proxy deployments into your Continuous Integration/Continuous Delivery (CI/CD) pipelines using Maven and Mulesoft's Maven plugins. This ensures consistent, repeatable, and fast deployments.
- Documentation:
- API Specifications: Maintain accurate and up-to-date API specifications (e.g., OpenAPI/Swagger) for your APIs in Exchange.
- Internal Documentation: Document your proxy's internal logic, configuration, and dependencies for easier maintenance by development and operations teams.
By systematically applying these best practices, organizations can transform their Mulesoft proxies into highly effective, secure, and resilient API gateways that form the backbone of a successful digital transformation strategy. These practices not only enhance the operational efficiency of your API infrastructure but also significantly improve the developer experience and ultimately, the success of your digital products and services.
Conclusion: Mastering the Mulesoft API Gateway
The journey through creating a Mulesoft proxy, from initial setup to advanced configurations and best practices, underscores the profound importance of a robust API gateway in today's interconnected digital landscape. We've meticulously explored how Mulesoft's Anypoint Platform empowers organizations to establish a powerful intermediary layer that not only protects invaluable backend services but also significantly enhances the agility, security, and performance of their entire API ecosystem.
We began by solidifying our understanding of the strategic imperative behind an API gateway, recognizing its critical role in centralizing security, managing traffic, simplifying development, and providing invaluable insights into API consumption. The Mulesoft proxy, at its core, embodies this gateway pattern, acting as an intelligent intermediary that forwards requests, transforms payloads, and enforces a wide array of policies.
Our step-by-step guide meticulously walked through the practical aspects: * Defining the Backend API: Identifying the target service for our proxy. * Setting Up the Project: Creating a new Mule project in Anypoint Studio. * Implementing Core Logic: Configuring the HTTP Listener and HTTP Request components for transparent forwarding, augmented with essential error handling. * Deployment to CloudHub: Making the proxy accessible as a live service. * API Manager Registration: Integrating the deployed proxy with Anypoint Platform's API Manager to unlock governance capabilities. * Applying Policies: Demonstrating the transformative power of policies like Client ID Enforcement, Rate Limiting, and Caching, which elevate a simple proxy to a full-fledged API gateway. * Thorough Testing: Ensuring that every component and policy functions as intended.
Beyond the basics, we delved into advanced configurations, highlighting how DataWeave can perform sophisticated transformations, how versioning strategies can manage API evolution, and how resilience patterns like circuit breakers can fortify your API gateway against backend failures. The discussion on security considerations emphasized the non-negotiable need for robust authentication, authorization, and threat protection at the gateway level, positioning it as the primary line of defense. Furthermore, the importance of comprehensive monitoring and analytics was underscored, providing the visibility necessary for proactive management and informed decision-making.
Finally, by comparing Mulesoft with other API gateway solutions and introducing open-source alternatives like APIPark, we gained a broader perspective on the diverse options available for API management, particularly highlighting APIPark's specialized focus on AI integration. This contextualization reinforces that while Mulesoft is a powerhouse for enterprise integration, the choice of API gateway should always align with an organization's specific technical requirements, strategic objectives, and operational philosophy.
In mastering the creation and management of Mulesoft proxies, developers and architects are not just implementing a technical solution; they are building the connective tissue of the modern digital enterprise. They are enabling secure, scalable, and intelligent interactions that drive innovation, enhance user experiences, and unlock new business opportunities. The API gateway powered by Mulesoft is more than just a component; it is a strategic enabler for the digital future.
Frequently Asked Questions (FAQ)
1. What is the primary purpose of a Mulesoft Proxy in the context of an API Gateway?
A Mulesoft Proxy primarily acts as an intermediary between API consumers and backend API implementations. Its main purpose is to centralize cross-cutting concerns such as security, traffic management, routing, and monitoring, protecting backend services from direct exposure and enhancing the overall governance and performance of APIs. It allows for consistent policy enforcement without modifying the backend API's code.
2. How does Mulesoft's Anypoint Platform help manage the API lifecycle?
Mulesoft's Anypoint Platform provides an end-to-end solution for API lifecycle management. It includes Anypoint Studio for API design and development, API Manager for applying policies (security, QoS, traffic management) and managing API instances, Anypoint Exchange for API discovery and consumption (developer portal), and Anypoint Monitoring for real-time analytics and alerts. This integrated suite enables organizations to design, build, deploy, manage, and govern their APIs effectively.
3. What are some essential policies I should apply to my Mulesoft API Gateway?
Key policies to consider for an API Gateway include: * Client ID Enforcement: To authenticate API consumers with a valid Client ID and Secret. * Rate Limiting/Spike Arrest: To control API traffic, prevent abuse, and protect backend services from overload. * HTTP Caching: To improve API performance and reduce backend load for frequently accessed data. * JSON/XML Threat Protection: To defend against common attack vectors like excessively large payloads or deeply nested structures. * OAuth 2.0 / JWT Validation: For robust user-based authentication and authorization.
4. Can a Mulesoft Proxy transform data payloads?
Yes, absolutely. Mulesoft proxies can leverage DataWeave, a powerful transformation language integrated into the Mule runtime, to transform request and response payloads. This allows for converting data formats (e.g., XML to JSON), restructuring data, filtering fields, or enriching messages, ensuring that the API gateway can adapt to diverse consumer and backend requirements.
5. How does Mulesoft handle monitoring and analytics for API Gateways?
Mulesoft provides comprehensive monitoring and analytics through Anypoint Monitoring and API Manager Analytics. Anypoint Monitoring offers real-time dashboards, custom alerts, and centralized log management for Mule applications. API Manager Analytics focuses specifically on API usage, performance, and policy enforcement metrics, providing insights into consumption trends, latency, error rates, and the impact of applied policies. These tools are crucial for proactive problem identification, capacity planning, and ensuring API reliability.
🚀You can securely and efficiently call the OpenAI API on APIPark in just two steps:
Step 1: Deploy the APIPark AI gateway in 5 minutes.
APIPark is developed based on Golang, offering strong product performance and low development and maintenance costs. You can deploy APIPark with a single command line.
curl -sSO https://download.apipark.com/install/quick-start.sh; bash quick-start.sh

In my experience, you can see the successful deployment interface within 5 to 10 minutes. Then, you can log in to APIPark using your account.

Step 2: Call the OpenAI API.